Showing posts with label blue. Show all posts

Thursday, 28 February 2013

Woo-hoot! What a pair...

Aww... they really are quite quick to make... here's girly...


And what a pair they make! Don't forget the pattern is over in the PATTERNS section, let me know if you have any trouble with it so I can adjust it.x


Have fun!!


Wednesday, 27 February 2013

What a Hoot..y!

I spent yesterday at the Bluebird Indoor Market in Dover, and while we weren't selling we were chatting away... one lady, who makes gorgeous plush fabric doorstops was crocheting an owl from a magazine pattern and having a bit of trouble making sense of it... some just don't make sense! Anyway, it piqued my interest so this morning I decided to make my own... and try to write an easy pattern to go with... so here's the first one, wasn't too hard to plan and he looks great! The instructions are over in my PATTERNS section.


What do you think? Sweet or not? I'm going to do a girly version now which I'll probably get finished in the morning...
Why not gather some wool up, it doesn't take very much and you can use scraps for a funky version, pop over to the tute and have a go, promise you'll get hooked and want to do more! 


Wednesday, 13 February 2013

Market and make its...

Where does the time go? I keep planning to do a new post, then get caught up making listings or liking some great shops on Facebook... That's not to say I spend all day on the laptop- nooo! I do get a little bit of work done too!
I'm halfway through a selection of items in my collaged textiles so I thought I'd show you my process... As I've mentioned before I make each piece on a 12 x 14" base, so once it's used up, that's it- totally unique and utterly limited. 


It takes a good few hours to cut and layer scraps of fabrics, plastics, punchinella, wool, or whatever feels right, and interweave it with embroidery and machining in different stitches and colours. Once it's finished the hardest thing is to decide what to use it for... if  I'm planning a backpack I need to take that first because it takes most of the piece, from there I choose items according to what I can squeeze out of it.. a needlecase, pincushion, and if there's any left, maybe a dongle cover or keyring...

I spent yesterday at the Dover Bluebird Market, and as usual I took along some pieces to work on, all cut, prepped and ribbons, buttons and pages chosen.
Here's what I  managed to get done...


So here they are,2 new needlecases, 7 keyrings and a pincushion...  2 more cases to go, sew in the pages and they'll be ready. Next I have to finish  a waistcoat... watch this space!


Sunday, 9 December 2012

Moleskine Journal Adventure continued...

After my introduction to Moleskine journals, having purchased a letter-sized Cahier for a commission, I decided to use up the second book which has the same designer cover, but in a different colour- orange. So I took that as a starting point for the design for this one. It hasn't been commissioned, this will be a ready-made, buy as-is.
I love blue and orange together, being opposite colours they really bounce off each other creating real impact. I searched my stash of papers to create the title page first- not normally the way I work, usually it's the collage first. I found some great orange and blue papers and flowers...


Working from the title page I chose an abundance of blue, orange and pink fabrics and began to layer up...


Each layer is built of with different stitches and coloured threads, fabric, plastics, wools, angelina, paper, canvas... whatever feels right and looks right. 


Once all the elements are secure and a few contrasting stitched patterns are in place I can add the central ribbons for the spine.


I always make an extra smaller square at the same time, some of this is used for the closure and the bookmark tabs, the rest is kept as reference. Add the closure and ribbons, then add the pocket for the inside front. Once all that is complete I can measure and sew up the bottom and top for a snug fit.


I always add some extra elements, often beads and charms, but I've had this butterfly crying out to be used since I diecut it, and it's a perfect compliment for the cover and copper lettering inside. Add a little crochet flower, the bookmarkers and velcro, line the inside opening with matching poly-cotton, and ta-da, she's all done! All ready for Etsy and Creative Stores...


Perfect and in time for a christmas pressie....


Monday, 3 September 2012

Needlecase sewing set, mum's birthday pressie...

I'm sure I'm not the only one with this problem- what do you give  your mum when they can buy what they want themselves, and spent many years teaching dressmaking so expects perfection?
I'm trying to get her back into sewing now she's retired, so eventually I decided to make a couple of things that might inspire her to get the machine out again- a needlecase and a wrist pincushion. I usually use bright colours and funky patterns- but that's not mum, so I had to raid my stash...
I've added a step by step tutorial over in the how-to textiles section, pop over and have a go- they're really quick and fun to make- honest!!


I used a remnant of sea striped canvas, some felt for the pages and a few of my crocheted flowers. Needless to say I made one of my gift bags  to present them in, and huge sighs of relief when mum really liked them, and has agreed to make my daughter a hunting jacket to christen them- hooray!! 
Having seen her old tattered pincushion I spent this morning making a replacement ball pincushion in matching fabrics... hope she likes it too.


Sunday, 2 September 2012

Sun, Sand and Cement

I've been meaning to make some stepping stones for my garden for a long time- just not got round to it due to other projects... but with hubby off for 2 weeks and nowhere to go I thought I'd use the time to do "my" projects and have a holiday too.

As a test run for the cement mix I did a sun and moon using molds from Ebay, but I think they won't be strong enough to handle foot traffic so I painted them up and decided to make a wall plaque for each. As I'm heavily into the Elements alot of my work is tied in to them, either just by colours or reference to the actual element, I thought it the perfect theme for the garden.


Acrylic paints cover cement beautifully, but I did paint a sizing layer of diluted PVA on first. Because I used a cement mix of 1 part cement; 2 parts fine sand and 1 part sharp sand, mixed with water and a splash of PVA to plasticize the mix, it settled into the mold nicely and I only had 2 air bubbles, despite some vigourous tapping to dispel any air!
The sun had some fine detail, the moon very little, and the celtic knots are shallow but with lots of detail. Even the knots came out well using that mix. These were also painted with acrylics. Once it's all together it will be waterproofed and sealed.

I laid out my pattern on a table to gauge placement and scale, then set up a trough using one of my silk-painting frames covered with thick plastic. This allows the concrete to be poured into a former that will be easy to remove and remain clean. I also used two straws to create holes at the top for fixing later- it would be impossible to guarantee drilling wouldn't damage the plaque or chip a section out.
I made up a stronger mix for the concrete; 1 part cement, 1 part fine sand, 1 part sharp sand and 1 part fine aggregate. I added PVA to this mix too. This was poured into the former, leveled with a trowel and the sun placed in the centre. With a little wiggling and pushing she settled in nicely and then there was the big rush to add the celtic knots and all the glass nuggets in their respective places. It set a little too quickly so I ended up gluing the tiny mirror tiles in some places. 

I think the overall effect worked out well enough, although I love precision and accuracy, sometimes it's nice to be rustic and natural, especially once it gets a bit weathered and mossy.


The coloured nuggets were sunk into the mix, but the clear were added later using an acrylic polymer medium. Once it was completely dry I used a Gedeo waterproofing liquid all over the plaque, and sealed with an acrylic gloss varnish.

This is the sun plaque finished, onto the moon soon... and then I will have the concrete mix perfected for the stepping stones. I'll be using the sun and moon molds again, but the glass will be sea glass that I've been collecting for the last few years.


Thursday, 28 June 2012

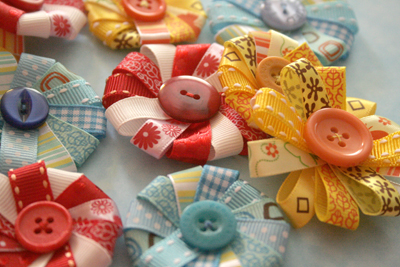
RIBBON FLOWERS

I've been playing around with my ribbon stash again, setting up a supply of embellishments- I love making flowers- in beads, fabric, paper... whatever I need at the time... These are very quick and easy, won't fray, and look great in a single colour or a mix.
You will need 20-30" of ribbon, matching thread and a button. The wider the ribbon the longer the lengths should be, but it's best to play with them to see which look you prefer.
I have put the whole tutorial in the crafts section but here are a few pics to inspire...


These can be made any size, the longer the petals the more you can add... creating a wide daisy. The smallest of these is 1 1/2inches across.
Pop over to the tutorial grab some materials and have a go- once you've made one you'll be making more- the hardest thing will be deciding where to use them all!

Wednesday, 29 February 2012

Bookmaking...part deux

You might remember the little squashy book I made for January's prompt, I posted a tutorial in the how-to's books section above. It was great fun and will be a little photo album pressie...
This month February's   prompt was posted for an accordian/ concertina book. I've just finished mine and will post the tutorial shortly in the book section, but I couldn't wait to post it now!
I'm doing a zodiac wall hanging, and with my memory being so appalling I get fed up of getting my books out to check on the signs/dates etc, so I decided to use this as a small reminder to help me out.
Here's how it turned out...

Finished book covers and ties

Symbols and names, shall be adding dates etc...

Saturday, 11 February 2012

Under the sea....

Following on from my red textiles collage, which was created as a base for further projects, I used a similar technique for another postcard swap, at stitchin fingers.  
The theme for February is "Under the Sea" and there are some beautiful postcards being posted, and while I'm a competant chain stitcher, my imagination doesn't stretch to a decent rendition full of wonderful stitches and  sealife. So I did what I'm comfy with... got the machine out again...


This is the base complete- there's alsorts in there, curtains, organza, medical gauze, bra lace,felt, angelina, mulberry bark.... and as usual I made the piece alot larger than I needed, so there's plenty left for new projects later.
But this is what it was for in the end.... The fishies and starfish were extra goodies from a friend, I'm glad I found a use for them, I don't do fishy things much and I'd hate that they sat in my box of bits without hope of life. (Hope you like what I've done them them, Mary!)


 So these will be swimming their way to the States shortly... hope they arrive safely.


Wednesday, 18 January 2012

Felt artpin fun...

Morning!
I'm just catching up taking pics of the last few days projects.... one of my favourites has been the Artpin swap hosted by Joy and Dawna. I've not made these before, but I guess alot of what I do could be converted into badges/brooches as long as I firm up the backs.
There are some gorgeous examples posted in the swap already, but I wanted to make something using different materials so there's always a variety when receiving them.
I started with a base of left-over wet felt, added merino tops by dry felting. I then embroidered shapes and knots in contrasting and complimentary colours. Embellishments added were angelina, brads and buttons.
I made 6, but only 3 are being swapped, so I'll have 3 to use in later projects- book fronts, textiles, collages...


I really hope whoever gets them likes them...

Wednesday, 14 December 2011

17-17-17

I've just finished my entry into Trine's journal in our 17-17-17 Round Robin. ("host" deleted site)


Details are over in my 17 A-17 J-17 M page. This is the second journal I've added to in this RR. It's always so difficult getting started, but the journals so far have been beautifully made and designed so having them a little while helps to get the imagination flowing...

.
Related Posts Plugin for WordPress, Blogger...