
As I seem to be making more and more books and journals I ought to dedicate a page to their creation.
I am by no means an expert, but these tutorials will show my steps as I have chosen to work them. There are lots of great tutorials and videos online, hopefully mine will inspire you to have a try, or go on to more research...
JAPANESE STAB BINDING
Materials you will need;


 The textile is slightly larger than the card. Cut a piece of cotton 3/4 inch larger all round.
Zigzag the textiled piece onto the cotton.
 Cut the corners of the cotton diagonally close to each corner.
Use the thin strip to create an even gap, but do NOT glue this in place.
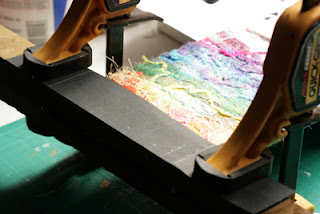
Glue around the edge of the card, using PVA or Copydex, and fold the cotton over, clamp while drying. Make sure the corners are tidy by folding them in tight when glueing. When both are done I cover in plastic and lay together under a heavy weight. Once dry the plastic will peel easily away from the cover.
 Meanwhile we can work on the other pieces. I decided to create folded inserts so they can either stand alone as a reference guide, or unfold for extra info.
Take as many sheets to correspond with your chosen sleeves, fold in half and trim.
The sleeves are 6" deep so the inserts are only 5 1/2 to allow for movement. They are also 2" shorter than the sleeve length.
 Cut 2 pieces of paper slightly smaller than the covers. When they are dry glue the paper in place, allowing for movement and folding. Crease the paper into the groove created by the mising slim strip of mountcard. Before it dries make sure it folds freely and adjust accordingly.
 Once pressed and dried again, the main pieces are now ready to assemble.
Before I glue it all together I cut and stick tissue paper to the back of each sleeve to stop the acrylic paints sticking.
 Create a template for the number of holes you want across the spine. Mark and punch each page if you cannot use a drill.
 Carefully position the sleeves central to the covers, and sandwich between 2 pieces of wood, place the template on the top and carefully clamp in place.
Drill through the layers with a 2mm bit.
 The covers drilled and ready to assemble.
 Using string or heavy bulldog clips, line the outside holes with needles and bind the whole book tightly.
I begin with double thread 6 times the width of the spine, and a waxed heavy hemp, but any strong string will work.
I have chosen a more complicated pattern so will not give directions here, there are many great vids on youtube for the basic format, so have a look first.
 The stitching finished... a zigzag version.. I guess you can make you your own up too if you feel adventurous.
 The main book complete. I could title it, or add crystals and beads....
 Back to the inserts, mark the centre point to coordinate with the sleeve cutout. Punch out with a 4mm punch.
 Press eyelets into the holes....
 Cut short strips of matching wool and threads
 Thread through the eyelet with a piece of cotton and pass the wool loop. Pull tight to secure.
 Slide the inserts into the sleeves.
This is the main body of the book completed, all I need now is the info that I want on each insert.
I've also dyed satin ribbon to make a tie to hold the book shut.
******************************************************
CONCERTINA BOOK
Materials you will need;
Papers, card, images, gel medium, hole punch, metal ruler, protractor, scissors or matt cutter, ribbons, inks, paints, anything specific to your design.
 I doubled my paper and spray mounted it together for stability. Choose the outer size of your circle, and either cut with scissors or a matt cutter. Make a second cut to the required width and remove the centre.
 Fold the circle in half, open, then fold again to make quarters. Open out and tape down. Run an offcut of paper or card across the centre hole level with the fold, and with a centre mark in place.
Place the protractor on the level in a central postion and mark off 30 degree points in both bottom and top sections.
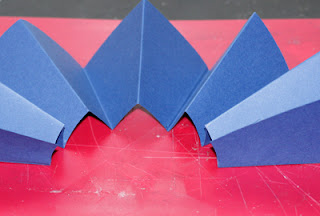 Fold the circle in half at each set of marks, giving 12 sections in total.
Fold these alternately and crease with a bonefolder or similar.

 Decorate the paper to your design. As I am doing a zodiac layout I will be doing a night/ starry background.
List of tutorials; top of page first
Japanese stab bound -stab bound book, my theme: colours
Concertina Book -simple folding , collaged cover ends
Book of Days journal -beaded spine, collaged covers, envelope inserts
Squashy Book- simple folded pages, printed covered ends
Concertina Book -simple folding , collaged cover ends
Book of Days journal -beaded spine, collaged covers, envelope inserts
Squashy Book- simple folded pages, printed covered ends
Notebook/journal -sewn signatures, beaded spine, textile covers
15+1 Artists journal- perspex covers with embellishments and UTEE
JAPANESE STAB BINDING
Materials you will need;
Mountcard for covers, material for covers (bought or collaged), card for sleeves, paper for end pages, tissue paper, light card for inserts, wool, ribbon, heavy hemp thread, eyelets, glue.
Ruler, craft knife, pencil, clamps,drill or awl, rotary mat-cutter or x-cut with ovals, weights, pattern scissors, punches; 2mm and 4mm, eyelet press.

180lb watercolour paper, sponged, stamped with stencils and punchinella in the chakra colours (I always add black for grounding, and white for higher crown)

Mark the paper to create a folder allowing for a slight overlap at the back.
Fold into 3 and glue the slight overlap.
Cut 2 pieces of mountboard slightly larger than the sleeves.

Using an x-cutter or similar cut a recess into the right side of the sleeve. This can be as big ir small as you like- you could just use a round punch if that's all you have.

Doublecheck the sizes of the covers and press under weight until dry.

Cut mountcard 1 inch from left and 2/16. This will allow movement once covered. The narrow strip will be omitted when glueing.

I am collaging my covers but you can use any material or paper.
Work on a piece large enough to cover both cards. I allow a little extra for turning, too much and it's impossible to glue the end pages.
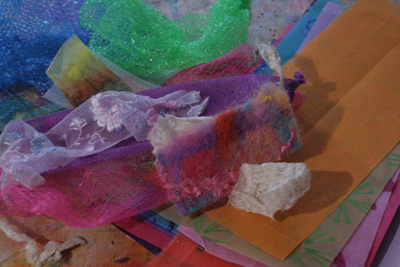
To build up I start on light felt and add fabrics and sew sparingly.

I add fibre papers and organza next and begin to work in coloured threads.

Continue building in threads and wools until you are happy with it.

Cut in half.

Zigzag the textiled piece onto the cotton.

Use the thin strip to create an even gap, but do NOT glue this in place.
Glue around the edge of the card, using PVA or Copydex, and fold the cotton over, clamp while drying. Make sure the corners are tidy by folding them in tight when glueing. When both are done I cover in plastic and lay together under a heavy weight. Once dry the plastic will peel easily away from the cover.

Take as many sheets to correspond with your chosen sleeves, fold in half and trim.
The sleeves are 6" deep so the inserts are only 5 1/2 to allow for movement. They are also 2" shorter than the sleeve length.


Before I glue it all together I cut and stick tissue paper to the back of each sleeve to stop the acrylic paints sticking.


Drill through the layers with a 2mm bit.


I begin with double thread 6 times the width of the spine, and a waxed heavy hemp, but any strong string will work.
I have chosen a more complicated pattern so will not give directions here, there are many great vids on youtube for the basic format, so have a look first.


This is the main body of the book completed, all I need now is the info that I want on each insert.
I've also dyed satin ribbon to make a tie to hold the book shut.
******************************************************
CONCERTINA BOOK
Materials you will need;
Papers, card, images, gel medium, hole punch, metal ruler, protractor, scissors or matt cutter, ribbons, inks, paints, anything specific to your design.


Place the protractor on the level in a central postion and mark off 30 degree points in both bottom and top sections.

Fold these alternately and crease with a bonefolder or similar.

Lay the folded book out on card and draw around it twice to create a template for the covers.
Cut these out.

Using inks and stencils, acrylic inks and a sponge I decorate the paper.
I add gold ink around the edges for a classical touch.
 The covers can be inked in the same way, but I found some nice zodiac pictures and decided to collage instead using gel medium as glue.
Build this up as required and embellish with glitter, inks and embossing powders.
 Cut two pieces of matching paper to the same size as the covers and glue in place. Ink around the covers for a distressed look- this will be overworked in gold at the end.
 Continuing with the pages I printed and cut out my chosen set of signs. These were glued to a fibrous gold paper and then glued to the page in the correct order starting with Aquarius for January.Embellish with glitters, inks etc, and stamp each name in each section. I will be adding the dates in black ink.
 Glue the covers to the pages and press under a book or two for a while.
If you wish, at this point you could add the ribbon tie by gluing it to the back cover before gluing the page. I am adding it in a different way for this book.
 Using a 1/8" punch make 2 holes in the left side of the back cover. Feed cord or ribbon from the back into the book and out the second hole. Tie with a double hitch knot.
Tie ribbons, threads, beads to the loop for dangly decorations.
Ink in gold around the covers.
Tie up and the book is complete...

Build this up as required and embellish with glitter, inks and embossing powders.


If you wish, at this point you could add the ribbon tie by gluing it to the back cover before gluing the page. I am adding it in a different way for this book.

Tie ribbons, threads, beads to the loop for dangly decorations.
Ink in gold around the covers.
Tie up and the book is complete...
 |
| Front and ties |
 |
| Inside symbols and pages |
 |
| Detail of Cancer page |
******************************************************
BOOK of DAYS JOURNAL
Materials you will need;
A completed set of signatures as for the Notebook/journal described below. Acrylic inks, paints, gesso, collage materials- papers, images, stickers, embellishments, cord, buttons, beads, memory wire (or fine cording) pigment inks, stamps, structure gel, acrylic liquid medium or glue, 1mm hole punch, ruler, craftknife, bone folder or plastic card. (A Sizzix for embossing/cutting if required)

The back edge will be flush to the edge of the signatures when glued.

Leave brushmarks in for an interesting texture, or roll with a piece of kitchen roll. Choose your colours in acrylic inks, or paints.


Continue to build up as required. I have added hand-dyed wool, coloured netting, silk threads, wooden and metal embellishments.


Each time you pull through add a bead.
If you get near the end without enough cord it is simple to work an extra length through the worked beads.

Glue ribbon to the outside edges inside the cover, leaving at least 2" into the cover.

Glue the endpage thoroughly and place on the cover flush to the beads but equidistant from top/ bottom. Drag a bone folder or plastic card over the paper to remove any bubbles.
You will now need to cut pieces for the envelope. Depending on the size of your journal you will need, for 1;

One piece slightly taller, but slightly narrower than the glued end-page (leaf)
One piece slightly narrower that the large piece and 1/3 of the width (flap)
One narrow strip the length of the leaf.
Two pieces shorter than the sides of the leaf, the same width as the long strip.

Carefully settle the leaf over the 3 glued pieces and fix in place. Check as it dries that the pieces are not stuck in the wrong places.


Place this at the outside edge of the cover to create the flap.
You can make several scores at 8mm spaces to allow the size to adjust as the pocket fills.

I used tiny brads, embroidery silk and charms for the fastening of the envelopes.
Here are the finished covers, except perhaps for the title which I may do in fimo or embossed foil, I haven't decided yet....

And this is as far as I've got with the title page and envelope...

I used embossed lettering, stick-ons, alcohol inks, pigment inks and stamps, technical pen, sharpies and pastels for the lettering.
Now for the fun job of filling it up!!!
******************************************************
SQUASHY BOOK
Materials you will need;
Canvas piece, inks, A4 papers, card, glue, stickers, stencils and stamps as required, ribbon and embellishments as required.
You will also need a metal ruler, craft knife, plastic card, spray bottles, baby wipes.
 Place stickers on the canvas as you wish. Make sure they are stuck down well as the ink will travel under them.
Canvas piece, inks, A4 papers, card, glue, stickers, stencils and stamps as required, ribbon and embellishments as required.
You will also need a metal ruler, craft knife, plastic card, spray bottles, baby wipes.


Lay out the embellishments/ stencils. Choose your colours and fill spray bottle. I have used alcohol ink diluted with surgical spirits. You can use acrylic inks diluted with water.
Begin to spray over the canvas irregularly.

As you spray, also using stencils, once you have a distinct white image under an object, move the object to another spot. This will build up depth and interest.
 Continue to build up layers of colours and textures until you are happy with the background.
Remove the stickers.


 Continue to build up layers of colours and textures until you are happy with the background.
Remove the stickers.

Pick appropriate colour pigment inks and stamps and work over the canvas. Vary the intensity of image by stamping twice without renewing ink. Clean the stamp with baby wipes before using the next colour to avoid the pad becoming contaminated.

With the same inks choose your focus stamps. I have chosen butterflies as the theme for the whole book. Work slightly heavier with ink in places to make them stand out.

Once dry, cut canvas to size. I always make sheets oversized so I have a stock for future use.
Because I am using A4 as the page size the cover will be @ 12cm. I cut the canvas 16 x 16cm for overlapping. 
Choose complimentary papers. I use a light card or heavy paper as the creases will eventually wear in a light paper such as printer paper.
Square the paper by folding one corner across diagonally to make a triangle. Cut the spare rectangle away.

You can, if you wish, emboss the cut- offs with an embossing tool. The butterfly stencils I used also work in a Bigshot so I will have coordinated papers. These can then also be die-cut as required.

You can use as many pages as you like, 5 squares will give a spread of about 1 meter. Use an odd number.
Fold the square into quarters, and if you didn't fold to make the triangle when trimming the page, do this now. Press down creases with the plastic card or bone folder if you have one.
 Arrange the pages so that they overlap on the squares. This can be done symetrically, or as a mirror from the centre. I have mirrored the overlaps so the centre page is underneath both adjoining pages. Glue these pages together allowing for the folding up, ie, leave a slight gap from the crease, check by lifting the bottom section up.
Fold the square into quarters, and if you didn't fold to make the triangle when trimming the page, do this now. Press down creases with the plastic card or bone folder if you have one.


To concertina, hold the first page and fold the diagonal creases towards you, but so that they begin to meet each other in the centre. The squares will then meet flat. The next page fold the creases away from you. Continue alternating folds until you finish. An odd number works correctly.

Glue the card into the centre of the back of the canvas. Trim the corners diagonally slightly away from the card corners. Glue and fold the edges over the back of the card. Rub all surfaces with your card/bone folder to eliminate any air bubbles.

Fold all the pages together. Cover the outside squares with glue (separately) and place onto the cover. Check placement and rub with card to smooth. Wipe away any excess glue, and repeat other end. Place under a heavy book to press and dry.

The centre page unadorned, ready for photos, stickers, printing, writing or anything you fancy!
Glue ribbon to the front cover only, and embellish as required.
et voila!

A present for a relative who hasn't any photos of our branch of the family.
******************************************************
NOTEBOOK/ JOURNAL
This tutorial is split into 3 parts;
1- Making the pages
2- Making the material covers
3- Complete assembly
First decide what size your journal will be- A4, A5 or square... These are made A6 so are handy for presents and pockets. They are also convenient as 1/2 A4 paper, which is readily available.

1- Materials for the pages; A3/A4 paper of your chosen quality/ colour, 2 pieces of coloured paper/card, beads if desired, ribbon,wax cotton, needles and foam pad.
You will also need scissors, metal ruler, craft knife and flat surface.

Depending on what size you have chosen to make, cut your paper accordingly. I have cut A4 sheets in half, when folded the page will be A6. Create as many pages as you require, allowing for an odd number of signatures.
I lay out the papers and pin the stack onto foam, this way all the holes will be uniform.

Depending on if you want beads along the spine, and in which spots, make an even number of holes along the middle line.
The ribbon is laid on to make the spine stronger and help fix the pages. Allow for the width of it when placing holes.
I want beads in the very centre, so have made the middle section slightly wider to accept my chosen bead layout.

With all the holes made I fold the papers in half. This notebook will have two colour pages so I slip one colour into the other. This is now a signature. It can have more sheets if you desire, but not more than 5 really, unless you have a guillotine to trim the outside edges level.

The coloured card will make paper ends, and as card will be less likely to buckle when glued.
Organise the signatures with the card on the outsides.
Organise the signatures with the card on the outsides.

For strength and ease of use waxed cotton is best. As I only had the heavy thread for a previous project I chose to split it into it's 3 constituent threads. Pulling it through your hands will soften the wax and make it easier to use.

Leaving a 3 inch tail work in and out of the holes of the first card. Slip the ribbon into it's allocated spot, and add beads where required. (You can tape the ribbon if required to stop it slipping around)

 Take the first set of papers- signature- and hold it next to the card, opened up. Simply push the needle through to its centre, and work along the holes as before, working over the ribbons and adding beads if required... narrow signatures will require smaller beads if they are to go on each signature. Big beads can be added every 3-4th signature.
Making sure that the thread is not slack in any spot, tie off the threads at the end with a double knot.

Take the next signature, hold in the same manner and push the needle through to the centre. Work along as before....

When you get to the end check the thread is not slack again. Instead of tying a knot, this time slip the needle from right to left between the card and the 1st signature, under the knot. As you pull the loop smaller drop the needle from right to left through the loop. Pull tight.

Carry on adding signatures in exactly the
same way adding beads on the centre signature and the card signature. Once you are at the very last knot work the looped knot twice, then cut leaving a 3 inch tail.

I find it is always more satisfying to work in multiples, if you have the materials out why not make the most of it!

2- Materials for covers; Heavy card, ribbon, baby wipes, acrylic inks or paints, coloured threads, beads, embellishments, stabiliser material.
You will need to cut 2 cards a little larger than your pages....

I inked up matching sets of babywipes. I also plan to embellish with coloured stitching, and possibly beads later. As wipes are too thin to machine successfully I will use a fibre-based kitchen cloth as a stabiliser.

Cut the stabiliser to the same size as the card, one for each wipe.

Lay out the cloth and place the wipe over it in the best position. If the wipe is a pattern it probably won't matter, but if the wipe has a distinct image it's best if it fits within the card size, which will need a little pre planning at the painting stage.

Stitch in a variety of colours and stitches as required. I also add pre-fused angelina fibres at this stage, or netting, plastic, etc.

A good afternoon's work....covers for 6 notebooks.

3- Materials for assembly; You will need a good glue, scissors, brush or spatula, roller or plastic card, heavy weights.
If you are not beading later, you can glue all over the back of the card, then flip and glue the front. If you are beading you will need to leave the back unglued.

It's better to cut the corners ( a rareity, really!) before glueing the front...

Fold the edges over and make sure they are well stuck. I use structure gel as this holds really well and gets into the fibres nicely. You can use it to strengthen the corners too.
Make sure the wipe is as flat as possible to avoid lumps in the end page.
Make sure the wipe is as flat as possible to avoid lumps in the end page.
Add the ribbon for the tie.

Either singly or at the same time, glue the outside pages, making sure to secure the ribbons and thread lengths in place.
Take care not to get glue where it shouldn't be...
Take care not to get glue where it shouldn't be...

Position the covered cards on the glued pages and adjust till in the right position. (it will slide for a short time)
Make sure the spine aligns with the back edge of the cover, adjust the beads to allow correct placement if they get in the way.
Check for excess glue in the wrong places.
Place under several heavy books....

Tie the ribbon, and there it is... I haven't decided if I'm going to put beads on the cover and ribbon ends....I might make a whole new series and heavily bead them instead....
 |
| Inked series and my new "swaps" record book |
******************************************************
15+1 ARTISTS JOURNAL
( This is the process I developed, but not the actual covers- these can be seen in the 15/15/15 section )
This is virtually the same process as the tiles below, with the added concern not to overheat the perspex as it will melt too!
You will need 2 pieces of perspex to size, clear and coloured embossing inks and powders, elements to include in the layers, inkjet transparencies, photos, heat gun, scalpel and rubber stamps.
A selection of materials ready for the covers
Mark both pieces with equidistant dots and carefully melt through with a soldering iron.
The number of holes will be dependant on the number of stitches in your signatures because the ribbon will tread from the holes through each stitch. I made 7 stitches.
There will also be a hole at the middle of the opposite edge for the closure ribbon.
Decide which will be the backside. Remember the first things on will be in front when turned over. Evenly ink the entire surface, cover with clear embossing powder and melt with a heatgun- do not get too close- the perspex will melt. Try a test piece first to guage it's resistance to heat, the thicker it is, the stronger.
While the powder is melted carefully drop the flowers onto it and continue to press and heat to ensure there are no bubbles.
Continue to build up embellishments and powder until you are happy with it.
If you are using transparencies, remember that you will need to print in reverse for texts. Again heat the gel and place the picture on while hot. You can then continue to build up layers of powder.
Angelina fibres can be added at any stage, either as small sprays of fibre, or as a pre-ironed sheet. Apply it while the powder is still melted, then gently waft over it to settle it in place (lower setting is advised for this as fibres will blow away until stuck)
Depending on whether you want a translucent cover, or a solid background, once you have added all your intended elements you can apply coloured embossing powder.
I used a colour around the edges, and a seafoam in the centre to keep the image light.
The front cover completed.
Work the back in the same fashion.

The front cover in peach, the back cover in lilac.
If you wish to stamp the title into the cover, apply four layers to the front, and ensure the powder is completely melted. Ink the stamp and apply immediately. Allow to cool for at least 20 seconds, then peel off carefully. If not correct, reheat and stamp again.
Keep checking back for the signature making and final construction....
If these quickie tutorials have inspired you to try something new- have fun, and let me know. Share your experience too! I've even set up a gallery page to show your work.
.
Loved these - very inspiring, thanks so much Kalona!
ReplyDeleteYour work is amazing and inspiring!I will have to come back to visit your beautiful blog and try one of your tutorials. Thank you for sharing and providing all of this wonderful information for us! Susanne
ReplyDeleteThank you, Kalona for these tutorials. I have made a squash book but I'd like to try other using your interesting informations. Thank you for sharing.
ReplyDeleteLove your style and designs Kal - your fiber work is so much fun - so glad we connect - looknig forward to more book making in 2013 - xxxxruth
ReplyDelete