Showing posts with label collage. Show all posts

Wednesday, 1 May 2013

A pinch and a punch... hopefully no returns!

  Happy Beltane, or Mayday, if you prefer. I cannot believe we are here already! I guess alot of it is because I now have a weekly routine of trundling to the Bluebirds Market on a Tuesday and everything else revolves around that lately. It's amazing how quickly a week goes by... 
  Always busy, I made 7 journals last month, and tried to finish my butterfly rucksack, but it has sat next to me on the sofa while I get on with other bits like embellishments for the journals.. it's been lovely, 4 of the journals were commissions, and have all safely arrived with their new owners who are very happy, which in turn makes me happy! Echoes sold yesterday too, so I shall have to make another creamy vintage journal soon.


  I've also managed to get some work in a handmade shop in Canterbury, Whitefriars Food and Craft Market so we'll see how that develops, Canterbury is very busy with lots of students and tourists, so fingers crossed. I just need to make a few extra bits to test run over there.. some larger dreamcatchers and a new textile accessory range, based around my collaged textile pieces. Where am I going to find the time?
  I shall finish the rucksack tomorrow, then I plan for a quilted messenger bag with some of the remnants. Then onto creating one of each of the expanded textile range, and creating the first wedding album cover... looking forward to that..
  So, busy, busy, watch this space- I can't promise I'll get time to post much, time gets less each week, which is great really, but I will be posting more fabric dying techniques, my monthly beading/ quilting block and all my swaps over in the Friends' Gallery, etc


Monday, 22 April 2013

More butterflies and journals

Over the last few months I've developed what was a one-off collage in a frame into a range of Artist journal/ sketchbooks... I knew getting the Cinch was going to cause problems!

Here are a few in the latest colours, I work each set in fours so they really are unique...

These are hearts and butterflies, I've also tried blinging a couple with little gems, what do you think?  I need to make some more now as I've just got a spot in a shop in Canterbury, which hopefully will be quite popular... watch this space!

Eac of these contain over 40 pages of mixed artist paper such as watercolour, pastel, cartridge, black and tracing paper. Perfect for mixed media artists who love using more than one medium. Each little section is separated with some gorgeous hand-made paper in coordinating colours. 

I'm also taking orders for these with a name added within the design, how special is that? Check them out on Etsy...


Wednesday, 13 February 2013

Market and make its...

Where does the time go? I keep planning to do a new post, then get caught up making listings or liking some great shops on Facebook... That's not to say I spend all day on the laptop- nooo! I do get a little bit of work done too!
I'm halfway through a selection of items in my collaged textiles so I thought I'd show you my process... As I've mentioned before I make each piece on a 12 x 14" base, so once it's used up, that's it- totally unique and utterly limited. 


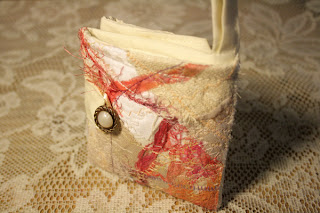
It takes a good few hours to cut and layer scraps of fabrics, plastics, punchinella, wool, or whatever feels right, and interweave it with embroidery and machining in different stitches and colours. Once it's finished the hardest thing is to decide what to use it for... if  I'm planning a backpack I need to take that first because it takes most of the piece, from there I choose items according to what I can squeeze out of it.. a needlecase, pincushion, and if there's any left, maybe a dongle cover or keyring...

I spent yesterday at the Dover Bluebird Market, and as usual I took along some pieces to work on, all cut, prepped and ribbons, buttons and pages chosen.
Here's what I  managed to get done...


So here they are,2 new needlecases, 7 keyrings and a pincushion...  2 more cases to go, sew in the pages and they'll be ready. Next I have to finish  a waistcoat... watch this space!


Monday, 28 January 2013

On a wing...

I spent today working in another international  Pass and Paint journal, courtesy of Willowing. It was Paula's, whose theme is "When she flies". I'd been thinking about what I was going to do for a while, and really wanted to do a folding pair of wings with tissue feathers, so yesterday I set about a heavy gesso layer with textural feathers across the page in preparation.
I collect those plastic boxes that mushrooms come in nowadays, and each one is dedicated to a project so all the materials are together in one place... until the project is completed. Anyway- I've had a box with the tissue and bits and bobs sitting accumulating for a couple of weeks now, but the final pieces were decided this morning after I used a die that I'd recently bought. 
I rarely work to a plan, but I might have a "want" for each project, knowing full well that once I get started it'll probably go out the window anyway...
I liked the idea of music as the base for the wings so I ripped and gessoed a pair, then stuck all the other elements I wanted to include. Once they were all in place they were gessoed again, then built up in pastel colours to give depth and movement. Once it was shaded to my satisfaction I added glass beads and pearlescent highlights.

Here's how it turned out.. before text


I really liked how the wings looked so I opted not to add fold-up wings, or tissue feathers... I wrote the text with a technical pen- I do wish I could learn how to do really nice text, it just doesn't come for me- calligraphy is one of those elusive techniques for me.

Here's the full piece...

 The photo doesn't show all the silvery highlights or reflective glass beads, but you get the idea... if you tilt it the light plays beautifully on all the textures and raised surfaces...

I hope Paula likes it.


Friday, 11 January 2013

Bookmaking fun...revisited

It was some time ago that I made a concertina book after a prompt in the Hinges group on Milliande's. The plan was to turn it into a family photo album- hence the specific stencilling on the canvas covers... that was so long ago!
As part of my "Finish up 2012 projects" campaign I sat down and finished it- woohoo! As it is a present for a family member that we've not seen before 2005 the photos are really about the kids growing up...
Here it is finished


There is a tutorial to make the book over on the How to's... Books page if you'd like to have a go. It's a beautiful little book and so versatile- you can use it for any personal story. Why not have a go?


Thursday, 10 January 2013

It's a cinch! really...

Having promised myself to scour high and low, internet and shop for a reasonably priced Cinch binder, I eventually found one a few pounds less than most, but with a bargain on coils to go with! So I did it... I ordered it, and it arrived Christmas eve so I didn't get to play with it until a few days ago... such frustration!

In the meantime my Big Bite had arrived, and being as compulsive as I am I had to play straight away...before friends arrived to stay... do you remember those really textural collage canvases I did  a while back? No? Here's a reminder...

I marked out the holes and spent an evening punching holes- what bliss compared to using a rotary leather punch! It is truly easy to use, I highly recommend it, and great for difficult places. My only issue is the depth of gap between the punch and base... by the time I put the canvas board in place I could not see my markings so some were slightly out of place... which, if you're a perfectionist like me, is completely horrible and unacceptable. (Still, I have the Cinch now, so not an issue for book cutting)

I had wanted to make some spiral bound artist journals with the set of canvases, and to make them truly unique I have filled them with a mix of papers, coloured hand-made papers to match the cover, water-colour, pastel, black, cartridge, card and charcoal papers- 4 or 5 of each in these 40 page journals.

Yellow- floral series, 40 mixed artist papers

Here's how they turned out- I'm really happy with them so I'll be putting them on Etsy and Creative Stores soon.


My Book, purple, 40 mixed artist papers journal
My Book, pink, 40 mixed artist papers journal


I still have to put papers in the green, red and blue books, but that won't take long at all. 
From then on I shall be using the Cinch to make the holes- and it also cuts through the canvas boards beautifully, making my life so much easier, hooray, more time to play!


PS. there's still a 15% discount on my Etsy stock if you type in NEWYEARSALE2013 at the checkout, but only until the 15th January, so grab a unique bargain now!

A tissue, a tissue...we build a house!

So, with friends staying over the holidays it was guaranteed to be a busy, fun time, with no time for creativity- of the non-food or drink kind!
So I have been busy in the last week catching up for my swaps... 
Marilyn is hosting a "Winter Wonderland" ATC swap on Milliande's. I decided to try something new, rather than painting or collaging pictures. 
I loosely sketched a winter scene on watercolour paper, then proceded to paste coloured tissue papers in the appropriate places. Once I was happy with the arrangement of colours I overlaid scrumpled white tissue to subdue the colour and make it more abstract. 


After the gel medium had totally set I loosely went over the faint pencil lines with a technical pen to outline the house and details.
They're ready to post now, I hope the recipients like them.
It was a fun experiment which I may well use again in a future project...


Why not have a go yourself? All you need is a few scraps of tissue paper, some glue or gel medium and a waterproof pen. 


Saturday, 8 December 2012

Christmas Pressie Rucksack

Lol, I'm making good headway with the pre-xmas creativity... Last week I started another rucksack, with a personal theme this time. I have photo canvas that runs though a printer so I chose a few relevant photos, funked them up a little with my favourite software and printed them out as features on the flap.
I used the same process for the bag as in my tutorial in the how-to section, adding pockets, loops etc before joining the base, then bodies together. Every now and again I have a eureka moment and find a new little trick to make it quicker, stronger or easier so I should do an update for the tutorial too.
This is an upcycled bag too! The canvas is actual artist canvas that has been worked on- it was an enormous piece but it cuts up beautifully into little abstract pieces. It sews beautifully too, strong but flexible.


Here's a closeup of  the flap, I love adding and adding the bits, watching it buildup into a little work of art, I never start with a plan, I let the design develop as it will... 


As you can see the owner to be is a horsy girl, with a thing for cats too... she doesn't know this is coming, I'm just sad to know I won't see her face when she opens it...
Just putting the finishing touches to it now...


Thursday, 22 November 2012

Medieval mixed media fun

It's taken a while, but I've finally finished my spread in Beth's journal Bygone Eras, which is part of our 15-15-15 international swap hosted on Milliandes. We're 2/3 through now and it's getting exciting and frustrating at the same time...
I've always been into the nicer side of medieval history, you know- the flowing gowns, knights on horses, dragons and chivalry... so it had to be my theme for a bygone age. 
There's a few personal photos in there, and it took a while to find the right images to go with, but here it is... almost complete. (I've finished it, but there wouldn't be any surprise if I posted it complete, eh Beth!)


This is the 2 page spread together, and I've put each page on my 15-a-15-j-15-m section if you want a closer look.
There's a bit of my chainmaille in there, some embossed copper, lots of stencilled gel medium, acrylics, pastel pencils and inks. Hope Beth likes it...

Wednesday, 14 November 2012

How many reindeer were there?

Even with my memory being great when I was younger I still cannot recall the reindeer names... I always miss one- or more! Just how many were there really?
Well, I have completed 6 so far... seems like a normal number for a set. How many sets I get made will depend on how quickly I get my other gifts completed.

Here is the fabric version, I have put a tutorial for them in my textile tutorial page. Why not have a go yourself? They don't take too long, but are well worth the effort. I shall be making a few more sets, and probably use a couple of different shapes too... well, it is Yule.


Saturday, 10 November 2012

Yule decorations already??

Well, sad to say, Yes! In all the shops already....I am one of these people who, although enjoying the notion of celebration, is totally fed up with the increasing over production/saturation and ongoing ruthlessness of retail xmas. The exploitation of staff at xmas, and the bullying of customers to buy more, for ever longer periods of time really makes me mad. Yes, you guessed it- I worked for a big retail store, one of the many who care only about year on profits... but enough of that... xmas should be about friendship, love, sharing and remembering. So on with the sharing....

So, Yule decorations already? Sadly, if you're actually making them then they need to be finished in good time, so I have started super early this year, and as Palma has started the 2012 Wichtel Swap already I've begun my countdown for crafting.
The swap calls for a hanging decoration and this years theme is "Reindeer". I had a good mooch online to see what was about, but wanted to do something original. I know a cutout isn't particularly original in itself, but I hoped that collaging the paper might go some way to help. 
So I spent yesterday gluing, pressing, cutting and sewing... not so difficult, but sometimes it's simple ideas that work out best... see what you think.


The sewing was pretty hard on the fingers so I actually resorted to digging out my rarely used thimble- unheard of! 
I really like how they've turned out so I'm going to spend tomorrow joining fabrics to make quilted versions... I'll let you know how they go...

Sunday, 28 October 2012

Creating a Book of Leaves

Last month Ruth began a prompt in our Hinges group on Milliande's to create a book of Leaves using a coptic binding technique. It's a very simple and effective technique and we've added some great little books into the discussion.
Here's mine so far- it's not filled up yet, but not too far to go. I've used a few techniques and am having fun...

The cover is a 3mm layer of plaster on MDF. I've scratched into the plaster and washed it with acrylics, added a few pics, then waxed over the whole thing. I drilled the holes before painting.

This is the endpage so far. I used several different papers to give me some variation in work... Leaves is an ink doodle highlighted with pencils.

The text is by an unknown author, but it resonated with me so I've used it over stamped texts and swirls. The leaf is a cutout with 2 pages stuck together and a bit of colour added.

This double-spread is an ink drawing, highlighted with coloured pencils.

Another unknown author, but given the time of year I thought it highly appropriate, and fun! Written in ink and highlighted with coloured pencils. The image is a tracing of a brassy leaf charm I have.

As I was working on the book an ATC arrived from Barbara in Canada, so I had to find a quick use for the funky tape she'd used... sometimes simple is just best! The brassy leaf used previously highlighted on a bronzy textured paper.

A printed paper is used as a background for an embossed and painted pattern on foil. I love macro so had to create a cellular pic of a leaf using copics and pencils.

Try as I might I cannot improve with my calligraphy. I love using it, but hate my writing... this is a well used quote by Camos, but I like it so have added to the long list of users.... Inked text over stamped texts and florals. Embellished with a paper flower rather than use a word, trying to add a new element.

More doodling... I love hearts and they can very easily be adapted into leaves. Coloured with copics.

There are a few more that I've not taken a pic of yet... collage and acetate windows... and a few more to fill up... so I'll update when I've done some more. 
Maybe you'll take a look at the prompt and have a go? If you want a similarly easy book to make take  a look at my tutorial here. Have fun and let me know how you get on!!


Saturday, 29 September 2012

Vintage meets modern...

Well, it's certainly been a bag week, this week... yesterday I created a creamy vintage/modern rucksack with upcycled fabrics and some of my collaged textile fabric. I had some left over so made a little wallet too.


This bag is basically the same pattern and method as I've detailed in my rucksack tutorial over on my how-to's textiles. I don't use a pattern per se, I just cut to size and play, but the construction method is very simple to follow if you want to have  a go!  I'm doing a tute for the wallet over the weekend so I'll let you know when it's up and available. They make a lovely set, eh? What about making a matching personal pocket too? for all your ladies accessories... there's a tute for that over there too. Just grab some fabrics and get cutting... you'll love it!!


Wednesday, 27 June 2012

15 A /15 J/ 15 M Round Robin Journal

Well, it's been so long since I worked in an actual journal, but in the meantime I've done a page for Rhelda as she didn't make her journal and we're creating loose pages instead...


Art and Soul- one of my website titles, and so me... art from the heart... such a cliche, lol!! Oh well, can't be helped- I am what I am!
I used a similar technique to those I've been playing with recently, but I didn't use gesso, so no heating and bubbling, I didn't think paper would be strong enough to cope.
I used several of my lino cuts to emboss cards and built them up with layers of colour. I also used acrylics, texture gel, sequins,tape, cut-outs, several types of pen/ marker and both oil and soft pastels. I really need to improve my text though, I still seem to mess a page up with bad writing...alot of it is because i struggle to find a pen that will write nicely over pastels... anyone got any suggestions?
Hope Rhelda likes it... I've also added it to the ongoing diary section which has all my pages in other journals, and others work in my journal... it's coming on now... nearly halfway though!

Thursday, 7 June 2012

Butterflies are definately in this month...

A few days earlier I posted my heart for June's prompt... the material featured this month is gesso, highlighting "fossilised" shapes and textures. The heart turned out really well, and I enjoyed creating it so much I decided to do some more...


Here's the first one... on a spare piece of mountboard. I don't often use green but I thought it would work well for this. I shall probably frame this one, but I decided to create a set and have them proud of the frame so I'm collaging onto 6 x 4" canvas boards. It will be a set of four, one for each season... I'll post once they're done.

Tuesday, 8 May 2012

Paper fabric and birthday cards...

Paper fabric? I've not tried it before, but as I'm doing alot of mixed media and textile work lately, it seemed only fitting that I give it a go... creating a material stronger than paper alone by collaging layers onto a fabric base.
What fun! I didn't have any muslin for the base, so I used some ponge silk, which would have it's own benefits/ downsides mentioned later.
I gathered up a collection of tissue papers, leaf skeletons, napkins, string, quilling strips etc. Next came ripping, tearing  and  cutting random shapes.
The idea of fabric paper is to have the benefit of pattern/texture and flexibility of paper, but with the added strength of a material base. Using a 40/60 pva/water mix lay out the material on a plastic sheet and wet it down. Adding papers and the other materials in layers, I built it up until I was happy with it, then overlaid with a white tissue paper. I made four with different themes; nature, butterflies, trees and funky. I also sprayed alcohol inks throughout the process... I could have tried glitter, angelina, sequins... or any number of other items!
I laid them out to dry in the sun, but they seemed to firm up even more over the next couple of days.
They turned out quite well for the first batch- I'd like to get a more flexible piece next time, maybe a texture gel will be more forgiving?


When I began to cut out for the birthday cards I found that the silk hadn't stuck very well, so I began to peel it away. Luckily it came away clean, leaving the paper layer intact. However, it did have one suprise, as the glue had seeped into the inks on the papers in some cases it had spread through to the silk, so I had loose, blended image transfers. I shall be trying this again! with specific images. Both the alcohol inks and the sharpies used on some of the papers transfered really well.


One of the projects I wanted this paper fabric for is my Birthday cards swap... I had 7 to make this month. I cut the standard 6 x 4" with various patterned scissors. I planned to work on the elements again as I'd just cut out the set in lino, so I embossed them onto handmade papers and highlighted them with inks. Adding ribbon, brads, and printing "happy birthday" on leaves finishes them off nicely. I also made a name tag on frosted shrinkies for each recipient.

Here they are complete...


I also had a quick play for a bookmark swap and came up with these little treasures...


Related Posts Plugin for WordPress, Blogger...