Showing posts with label reds. Show all posts

Saturday, 16 March 2013

From Black & Red to Red & Black

Well, that was another quick make...  only this one was more reds than black, and I found a lovely slinky fabric to feature on the flap and pocket. It doesn't fray so I couldn't use it in the main patchwork... but nevermind, the contrast makes it better.


I think two is my limit for the time being on the Skull theme as I have some rather gorgeous butterfly and Volkswagon fabrics... I shan't be mixing them together.. two bags are coming! I am wondering about whether the try a messenger style bag using my patchwork, what do you think?  I'm building up to making I-pad cases with the leftover patchwork from each bag, too... 
I've just managed to get my Etsy listings up to date and this one is on as well, and this month we're running a FREE UK postage if you type in FREEMARCH13 at the checkout.


Friday, 1 February 2013

13 days to go...if you do Valentine's Day

  If you celebrate Valentine's Day, that is!  We don't at my house, but I still get caught up in the flow with everybody else's creative exploits in a red and hearty fashion...
  My very obliging friend Mary sent me some die cut hearts to show me what sizes were available for cutting grey board... and of course I had to do something hearty and romantic- not my strong point, so be gentle!
  Mary cut from corrugated board, so I thought I'd tissue and gesso it up to give it a bit of support and to add some texture. Using a technique that I've been playing with alot lately I added flowers, butterflies and sequins with gesso, and heated it to bubble it.


  Once it was suitably dried out I painted it up to give depth and shadow  and highlighted it with those gorgeous Golden irridescent acrylics- you can't see it in the pic, but when you twist the books they shimmer with 2 colours in places. 
  When my Cinch arrived I'd already bought a pair of wires but not used them, so I cut them down to use for these... not sure I've got the hang of the squashing yet... I was expecting grooves or something to show how to place the book/ wires so they folded correctly. I think I need to play more... or carry on with the coils that I have an abundance of.
  I spent this morning cutting pages and lightly inked the edges before punching  with my Big Bite. That's both new xmas toys being put to good use already, I'm sure they're going to get a serious workout over the year!

  So, thankyou Mary for your help, and the next lot winging their way to me... now I know which die to save up for.


Oh, and while I was distracted on another hearty woolly project I had theses sitting in latex so I can make some hanging plaques in plaster. It's all about developing... so you'll see them soon!

Sunday, 2 September 2012

Sun, Sand and Cement

I've been meaning to make some stepping stones for my garden for a long time- just not got round to it due to other projects... but with hubby off for 2 weeks and nowhere to go I thought I'd use the time to do "my" projects and have a holiday too.

As a test run for the cement mix I did a sun and moon using molds from Ebay, but I think they won't be strong enough to handle foot traffic so I painted them up and decided to make a wall plaque for each. As I'm heavily into the Elements alot of my work is tied in to them, either just by colours or reference to the actual element, I thought it the perfect theme for the garden.


Acrylic paints cover cement beautifully, but I did paint a sizing layer of diluted PVA on first. Because I used a cement mix of 1 part cement; 2 parts fine sand and 1 part sharp sand, mixed with water and a splash of PVA to plasticize the mix, it settled into the mold nicely and I only had 2 air bubbles, despite some vigourous tapping to dispel any air!
The sun had some fine detail, the moon very little, and the celtic knots are shallow but with lots of detail. Even the knots came out well using that mix. These were also painted with acrylics. Once it's all together it will be waterproofed and sealed.

I laid out my pattern on a table to gauge placement and scale, then set up a trough using one of my silk-painting frames covered with thick plastic. This allows the concrete to be poured into a former that will be easy to remove and remain clean. I also used two straws to create holes at the top for fixing later- it would be impossible to guarantee drilling wouldn't damage the plaque or chip a section out.
I made up a stronger mix for the concrete; 1 part cement, 1 part fine sand, 1 part sharp sand and 1 part fine aggregate. I added PVA to this mix too. This was poured into the former, leveled with a trowel and the sun placed in the centre. With a little wiggling and pushing she settled in nicely and then there was the big rush to add the celtic knots and all the glass nuggets in their respective places. It set a little too quickly so I ended up gluing the tiny mirror tiles in some places. 

I think the overall effect worked out well enough, although I love precision and accuracy, sometimes it's nice to be rustic and natural, especially once it gets a bit weathered and mossy.


The coloured nuggets were sunk into the mix, but the clear were added later using an acrylic polymer medium. Once it was completely dry I used a Gedeo waterproofing liquid all over the plaque, and sealed with an acrylic gloss varnish.

This is the sun plaque finished, onto the moon soon... and then I will have the concrete mix perfected for the stepping stones. I'll be using the sun and moon molds again, but the glass will be sea glass that I've been collecting for the last few years.


Thursday, 28 June 2012

RIBBON FLOWERS

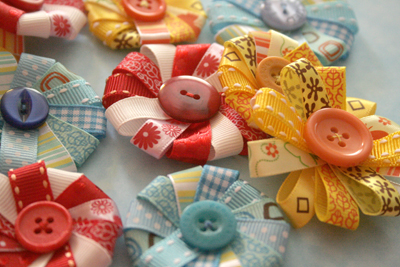
I've been playing around with my ribbon stash again, setting up a supply of embellishments- I love making flowers- in beads, fabric, paper... whatever I need at the time... These are very quick and easy, won't fray, and look great in a single colour or a mix.
You will need 20-30" of ribbon, matching thread and a button. The wider the ribbon the longer the lengths should be, but it's best to play with them to see which look you prefer.
I have put the whole tutorial in the crafts section but here are a few pics to inspire...


These can be made any size, the longer the petals the more you can add... creating a wide daisy. The smallest of these is 1 1/2inches across.
Pop over to the tutorial grab some materials and have a go- once you've made one you'll be making more- the hardest thing will be deciding where to use them all!

Friday, 6 April 2012

MATCHBOX FUN...

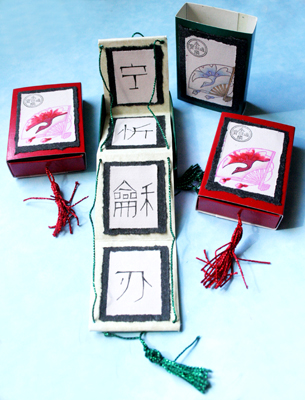
I'm getting into the swing of making themed matchboxes now... the latest monthly theme over at milliande's is "Asian" So much to play with there so I did a bit of research into kanjis... beautiful characters that signify a word or thought... I found several that were fitting so I decided to make a little concertina wall hanging.


These are the cover and boxes... lucky I had a small set of oriental stamps waiting for such a project, and my copic markers needing breaking in too!


This is the full length. It draws up with cord. I'm not sure whether to put a translation in with them, or leave it for my swap partners to research and find each kanji... but I've ordered them so that they create a loose meaning... maybe I'll leave it a month, then forward the translation!

Thursday, 23 February 2012

February.. the month of hearts...


This is my February heart for the Heart Journal project in my previous post. This month the featured material was air-dry clay- something I have plenty of... already rolled, stamped and some painted for just such a project.


Related Posts Plugin for WordPress, Blogger...