
Quick step by step tutorials of a textile variety; silks, felt, collage, ribbons...
The list of Tutorials, top of page first;
Reindeer Decs textile hanging decorations
Reindeer Decs textile hanging decorations
Rucksack fabric lined rucksack with tie straps
Sewing Set needle case and wrist pincushion
Ribbon Flowers simple ribbon and button blooms
Sewing Set needle case and wrist pincushion
Ribbon Flowers simple ribbon and button blooms
Fabric Dolls hanging simple pattern dolls
Fabric Doll hanging leggy pattern doll
Canvas postcards and ATC's
Heart scent pouch- woven ribbon pouch
Fabric Doll hanging leggy pattern doll
Canvas postcards and ATC's
Heart scent pouch- woven ribbon pouch
Personal Pocket- little textile bag/pocket
Prayer fl-inchies- a mix of flags and inchies, babywipes and embellishments
Prayer flag- needlefelt, foil embossing and beading
Inchie/twinchie box- wet felted and embellished cubes
Felted satchel- wet felted and embellished art bag/satchel


Don't forget to take a pic of them and send me a copy for the gallery!
***************************************************
RUCKSACK


 Cut 2, or more, 4 x 2 1/2" pieces, these will be loops for phones, keys etc.


 Add in one of the loops.


 Trim the triangles away, trim the plastic to 1/4" and the fabric to 1/2".


 Cut out triangles around the curves.


 Turn the right way and oversew all around the edges for stability.


 Tie the ends at the length you require.


And TA-DA!! Here is the finished article...


Having test-driven it today I think I shall put a little bit of velcro on the inside pockets, but you learn by experience...
***************************************************
SEWING SET
I made this pair for my mum's birthday, but thought I'd share the process as they're not difficult to make.
You will need;
A piece of fabric at least 12 x 12". Felt or similar for pages, 3 of 7 x 31/2", thread, ribbon, stuffing, a button, embellishments as required, velcro or poppa.


 Cut a piece of fabric about 8-9" long. You can point the end- or not- as you choose.


 Fold in the open end by 1/2" and pin.


 Connected ball and strap.


 Fold case over and mark fold. Measure the width of the pages- approx 7 x 3 1/2".
 Cut 3 or 4 pieces of felt or chosen fabric to size.

 Fold the flap over and hold in place- mark the centre of the button. Allow a little slack for the ribbon to go over the button. Sew on place.
 This is technically finished, but I felt it needed something else so I added some of my previously crocheted flowers...

***************************************************


 Here is the red set...


 Lay out both fabrics


The body is now complete, the fun begins with embellishing...what will you choose?


 ...and autumn colours


 So here they are finished... both sides. I tied the ribbons loosely with wool, but may put some light stitches in to hold them. They also need a quick iron to get rid of those creases... but all-in-all I'm pretty pleased, given it's been forver since I made a doll..
I just hope my swap partner likes her...

****************************************************
FABRIC DOLL with arms and legs


 Do not fill to the top or you will not be able to get your sewing machine over the lump. Pin the tops to stop seepage while working on the other pieces.
 Work the arms the same as the legs, pin, sew, clip and turn. Fill and pin.


Sew the gap using ladder stitch, described for previous doll.
Embellish as required.


 The base coats, add alittle shade in darker spots around eyes and lips.
 Eyes and lips built up with darker shades, then accented with the Golden fluids.


*****************************************************
CANVAS POSTCARDS


Reindeer Tree Decorations
These hanging decorations follow a similar construction to my paper collaged ones. You will need fabric scraps, threads, ribbon, beads or sequins, heavyweight vylene/stabilizer, wonderweb, paper template, pins, scissors, sewing machine.
The aim is to first create a sizable piece of fabric using all the scraps of material you have.
 Place the pieces on a desk to arrange the colours, balance and spacing. My completed piece was 15 x 9", enough to cut 12 reindeer. Making a bigger piece will either give you more reindeer, or extra to make other decorations.
 Begin joining the horizontal seams. These can be different angles to mix up the collage look.
 Realign the long strips in the order that they will be joined.
 Sew up the lengths in order.
 Iron the wrong side first to make sure the seams are even and in the same direction. Flip over and press the front side.
 Choose a decorative thread and oversew down the seams on the right side. Vary the colours and stitches if you wish.
 Cut a piece of vylene/ stabiliser to size and bond it to the fabric with bondaweb or similar.
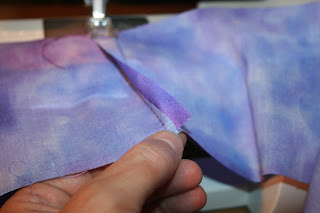
 Using your chosen template right side up, cut 6 reindeer one at a time- the fabric will be too thick to get the details if cutting double layers.
Turn the template over and cut another 6.
Try to keep the antlers away from a join when placing the template. Joins are best in the main body area.
 Choose your pairs and place wrong sides together.
The aim is to first create a sizable piece of fabric using all the scraps of material you have.
 Place the pieces on a desk to arrange the colours, balance and spacing. My completed piece was 15 x 9", enough to cut 12 reindeer. Making a bigger piece will either give you more reindeer, or extra to make other decorations.


Turn the template over and cut another 6.
Try to keep the antlers away from a join when placing the template. Joins are best in the main body area.

Use a few pins to hold the legs and head in place.

Using 3 strands of a 6 strand embroidery thread work around the shape using blanket stitch or overstitch. Beads can be added to the thread for a bordered look.

Choose your ribbon and beads/ sequins. On the small antler secure the thread and ribbon in place, allowing sufficient ribbon to fold into a bow.
Fold one end up into a loop and secure, then repeat for the second loop. Attach your beads. Trim the ribbon on the diagonal, and dab with nail polish to seal the ends.
And there she is... finish the rest in the same way, or make each one differently!

Don't forget to take a pic of them and send me a copy for the gallery!
***************************************************
RUCKSACK
This is a reasonably simple rucksack to make. The pockets and ties can be changed and adapted as you like. I decided to use tie straps for economy and style. You can use buckles, buttons, elastic etc, as you wish.
You will need 2 x 1m of fabric, either the same or complimentary. A lining or quilting fabric, 2m cord, eyelets x 8, metal ring, 1m bias binding, scissors, tape measure, pins, sewing machine, plastic for a card pocket if wanted.

My quilted fabric is 30 x 22" so my bag is limited to within these constraints. Using 1m fabric will allow a deeper bag if you wish.
I cut the lining to match the quilted size, this leaves extra for straps and all the bits and bobs.

I cut the main piece at 16 1/2" deep, for the whole length.

The base is cut at 14". I made a paper template for the curved corners.

Use the template to make the four corners curved uniformally.

The flap can be any shape- fold for a symmetrical shape with curved corners. I usually make the bag end smaller than the flap end.

Cut 2 straps at 4 1/2" wide for the whole length.

Cut 2 pockets to whichever size you like- these will be made into 3 segments so are quite wide.


I lay out at this point to decide if my colours/pieces/shapes are looking good as a whole, or if I need to change something- better to do it now rather than halfway through sewing!
I've decided on quilted main, with accenting flap, straps and pockets...

Fold the loop pieces in half, crease, and fold the outer edges into the centre. Pin and sew along the open edge.

The front pocket can be as plain as you like, but I've chosen to jazz it up a bit. I've added mesh and ribbon to cover the central segment.
All pockets will need some binding, pin bias round the cord 1/2" from the top edge, with the open edges to the top.

Use a zipper foot to get in close and running stitch the length of the pocket. Turn over, fold the raw edge down, and oversew along the seam on the right side.

Turn and pin each edge 1/2". Find the centre of the bag and place the centre of the pocket in line.Pin in place.


When pinning make an allowance for items to be put in by not pinning flat.
Sew down the side seam, along the bottom and back up the other side.
Turn and sew back to first segment, sew up and down to create the compartment. Sew along the bottom until the next segment seam, sew up the ribbon and back down again to create the second and third segments. Continue along the bottom and up the side.

Add your label if you have one..

Fold and sew the top edge of the inside pocket, then pin and sew onto the right side of the lining fabric in exactly the same way as the quilted pocket.

If you want a card pocket cut a piece of plastic 1" bigger than a card. Mark the corners and cut the fabric from the centre to each corner.

Place on the plastic and fold the triangles back. Pin in place and sew around the rectangle close to the folds.


Pin and sew in place, remembering not to sew all the way round.

For the flap- line one piece with lining or quilting and pin the cord in biasbinding all around the edge. Make sure the open edges are to the edge of the fabric.
As for the pocket, use a zipper foot and sew close to the cording for neat piping.

To help reduce bulk and give a nicer finish cut the quilting back to 1/4", and cut triangles around the curves.

Turn the right way and oversew around the inside of the cording.

Now for the main structure... Fold and find the centre of the fabric. Match and pin the centre of the base. Pin all around paying attention to matching on the curves without bunching up in places.
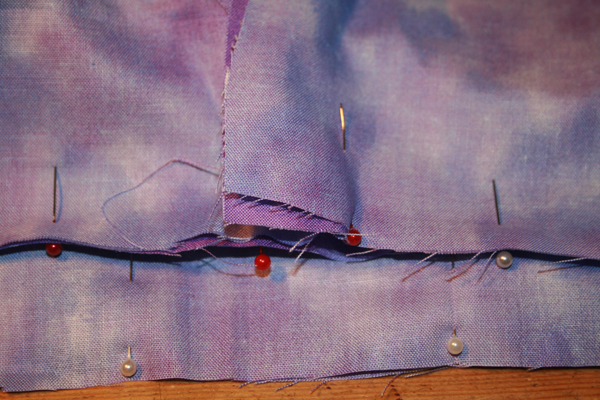
Before sewing around pin the edges of the main piece so they fit snug to the base, then sew together before sewing base to bag. You will need to remove some pins to allow movement around the sewing machine.

Once you have sewn the back seam, trim one side to 1/2" and lay the
longer flap flat and oversew down the length again. This will add
strength to the back seam.

Repin the bag to the base and sew around the base.


Repeat the previous process exactly the same for the quilted pieces.

Cut 2 x 6 1/2 x 2 1/2" pieces. Fold right sides together and sew along one short end and the long edge.


Take the 2 squares and fold edges in to reinforce itself. Pin and sew the straps under the squares. Make them sit slightly askew to help spread the load and stop there being too many bulky areas.

Pin in place on the back of the bag near the bottom. The starps will tie directly onto these loops so they need to be sewn well!
I sew all around the square, then follow the lines of the straps creating triangles down the square. You can work corners to corners if you wish...

You are now ready to put the bag together!!
Keep the outside bag the right way round and make sure the flap sits down the bag on the outside.
Keep the right side of the lining on the inside and slip it over the quilted bag. Both right sides are together!
Begin to the right of the flap, sewing just over 1/2" from the top. Work all round till you get to the left side of the flap. DO NOT sew the lining at this point! Continue to sew the flap only to the main fabric at the same depth.

You can add ribbons and loops while sewing the top seam- remember to pin them loop inwards, not out!
Trim the excess off the quilted/thicker piece then turn the right way. You will now have a big tube with a hole at the flap.

Pull it all into shape and roll the top edge to find the stitching. Pin all around ready to sew.
Fold and pin the lining to the flap now. Either hand sew in place or run a machine stitch along the flap.
Sew all around 1/2" from top seam. Remember to fold the ribbons and tags down as you work round so they are caught and face inwards.

Take both pieces of strap and sew together rights sides facing.
Trim one side to 1/4" and flatten the longer flap over and sew in place.

Fold the entire length in half, and beginning at an angle one end sew across and along the length of strap.

Oversew all around the strap, folding and turning in the open end to match the closed end.

Pin and sew into place. Work round several times and reinforce across the width of the section. I usually angle the stitching at both ends and turn the strap up so that it lays flat on your shoulder. Sewn in place.


Mark spacing for the eyelets. Make sure the number is sufficient to allow an even number and the centre 2 allow the cord to exit the bag.

Work each eyelet by cutting with the tool supplied in a kit, or a wheel. Choose a hole suitably tight for the eyelet- not the same size as the eyelet.

I work 12 holes with the centre 2 being slightly closer together for the closure.
Thread the cord in through the left centre hole, work around the bag and exit the right centre hole. Feed the cord through whichever type of sliding closure that you have chosen.

Choose a ring as a closure. Make another 5" strap from a scrap of fabric and oversew all round.

Fold the strap around the ring leaving the back piece slightly shorter than the front. Sew in place at the front centre of the bag.

Work round a few times for security. I usually handsew the strap tight to the ring to stop it slipping round.

Make a tiny strap @2" and fold the ends under. Place on the underside of the flap, about 2" from the edge. Oversew the ends in place. This is for the closing cord. I fold the cord in half and slip the fold under the strap, then pass the cord ends through the cord loop. Pull tight.

Although there are only 2 small areas of stitching showing on the top of the flap I like to hide it with an embellishment.
I've chosen a couple of my multi-coloured crocheted flowers as they're cute and compliment the colourscheme.
And TA-DA!! Here is the finished article...


Having test-driven it today I think I shall put a little bit of velcro on the inside pockets, but you learn by experience...
I hope you have a go... don't forget to send me a pic, and if you have any questions just email me- I'll be happy to clear anything up that's not clear.
***************************************************
SEWING SET
I made this pair for my mum's birthday, but thought I'd share the process as they're not difficult to make.
You will need;
A piece of fabric at least 12 x 12". Felt or similar for pages, 3 of 7 x 31/2", thread, ribbon, stuffing, a button, embellishments as required, velcro or poppa.

Gather your materials and tools together

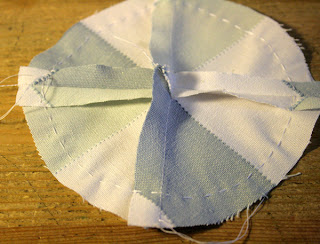
Fold a piece of paper into quarters, then eighths, mark 3" from point along both edges and in the centre, cut to make a curve through marks. Open the circle and cut a 1/4 segment. This is your template, you will need 4 pieces of fabric.

With right sides up, fold one piece over onto another so right sides are together. Do this twice so you have 2 halves pinned.

Sew down the pinned side about 1/2 inch from the edge. Do this for both sections.

Open the seams and trim the edges near the straight edge. Place both half segments right side together, and stitch.

Flatten out the new seam and sew a small running stitch all around the circle 1/2 inch in from the edge. Do not knot the last stitch, it will be gathered up to make a ball.

Gather up the stitching until the gap is approximately 1 3/4", make a knot to secure the thread.
Pack tightly with the stuffing.

When it is packed sufficiently hold together with your left hand, and loosely oversew the gathers across the gap to pull the edges to the middle. Do not pull enough to close the hole- simply make sure the edges are secured towards the centre.


Fold right sides together, pin and run around the point and long edge with your machine.
Trim back to 1/8" carefully up the edge, and nip across the corner. This will help reduce bulk when turning the right way.

Carefully push the pointy end into the tube and use a pencil to work the tube inside out. Do not push the point too hard or you could rip the stitching or fray the seams. Once the right way roll the seam in your fingers to push the seam to the edge, pin so it doesn't move again.


Machine running stitch around the edge to secure the seams. Needle the loose thread to the back, tie off the ends and stitch into the centre of the tube. Cut the end close to the fabric for a hidden end.

Pin the strap onto the ball. Work a tiny oversew stitch around the square of the strap.


Add velcro or a poppa where needed on the strap. I tend to use a small piece of the sticky strip, and a longer piece of the fuzzy strip- this allows a wider adjustment for different sized wrists.

For the case, cut a piece of fabric about 17" long and 4 1/2" wide. Fold in half. (You can use 2 different fabrics if you wish and firm it with card or vylene at this stage)

With right sides together pin a piece of ribbon in the centre of a short edge. Allow for the seam and size of button when working out placement.

Pin all around and run a seam 1/2" in leaving a 2" gap along one edge for turning.

As for the strap, trim the edges and corners near to the stitching, turn the case the right way, being careful not to poke through the stitching. Square corners gently with a pin if need be.

At this point I added ribbon, but this can be done before joining the pieces. Pin all around and close the gap in the same way as the strap.

Set up and choose a patterned stitch, run a small test piece to save errors on the case.

Sew all around closing the gap. This can be sewn with ladder stitch too to completely finish the gap.


Pin in place and sew down centre. When machining pin the pages closer to the top as the machine will slowly walk the pages as it sews and they will move towards the bottom edge.


So here they are complete, and now that mum has opened her pressy I've found out her old cushion is falling apart so I'll be making a full size pincushion to match. Why not give them a go and use them yourself- or give them as a gift to someone you love? Don't forget to send a pic...
***************************************************
RIBBON FLOWERS
These are quick and easy to make, and superb as embellishments for books, bags, art, hair accessories or anything else you can think of...
You will need;
20-30" of 1/2" ribbon. This can be any type of ribbon- organza, satin, grosgrain or even cut up fabric. Do note that if you use a wide ribbon you will need more of it to keep a reasonable proportion to the petal... my advice is play till you get what you like best! You will also need a button, or several beads as a centre, and thread.

Your chosen materials... my theme is red for this set.

Cut 6 lengths of ribbon at about 3". I usually do several sets at once at varying lengths. The flower will be slightly less than half of this length when finished, so cut according to your required size.

Thread your needle and knot the end. Lay the ribbons on top of each other, right way up, fold to the centre loosely and push the needle through from the inside, making sure it is central.

Pull the thread through and hold firmly, then pivot the ribbons round to form an evenly spaced wheel. Put a couple of retaining stitches through the centre, finishing with the needle tip just poking through the right side.

Holding with either hand (just in case you are left-handed!) fold the first ribbon over and catch it onto the needle, hold in place. Pull the next ribbon over and catch that on the needle too.

Continue in this way until you have caught all the ribbons in the centre. Work several holding stitches through the centre, finishing on the right side.

Choose your centre... this could be a button, or two, several beads, scraps of fabric, whatever you like. Sew through several times to secure.
You can at this point add a felt backing and brooch pin to the back, but I prefer to just tidy up my stitching and leave it as ribbon. I can add felt or card as needed for a project.


And this is the rest of the collection I made today... I need to buy some greens and purples so I can have a full rainbow selection, then it's what to do with them? I have a few projects in mind!
I hope you have a go- don't forget to send me some pics of your creations!
***************************************************
FABRIC DOLLS Simple version
On Milliande's Lois is hosting a equinox-doll-swap. These are a very simple doll to make, the time and effort is in the embellishing which is totally personal. The second doll has arms and legs and is a little more difficult, but still simple enough if you read the instructions and take your time.
For this project you will need;
paper for the pattern. My dolls fit into an A4 sheet, so 2 pieces of A4+ fabrics of your choice. Stuffing material, felt, ribbons,organza,sequins and beads, anything else you like...
Threads, scissors, knitting needle, pins, sewing machine (although you can make these by hand)

Fold your paper in half and sketch half a head and body shape. Readjust until you are happy with the complete shape. Refold and cut out.
Here you can see how simple the goddess shape is to draw out. The other is not very hard if you'd like to try it.

I add 1/4 inch to the shape for seams. Lay out both fabrics right sides together and cut out.
I will be using 2 fabrics, one each side, you may use one fabric for both sides, but still lay right sides facing.
 Lay out both fabrics
Pin together, then sew round leaving a gap for stuffing. I run the edge of the foot to the edge of the fabric, this takes up the 1/4 inch added. It also helps the material if you reverse the machine a few times at both ends of the stitching.

Because this will be turned inside out it is necessary to clip and cut the material on the outside of the stitching. Be very careful not to cut the stitching. On a curve that will turn in, like the head, cut small triangles, this allows them to sit flat when turned inside out.

Pull the head fabric pieces apart so that you can push your finger into it. Continue working the head through the whole body.
Make sure the point is properly turned by gently pushing a knitting needle or scissor arm into the point.

You are ready to fill the body with whatever you have chosen as filler. There are many options, fibres, foam, wool, pellets, beads etc. I am using textile waste which can be teased open and packed firm again.
Do not over fill, and add wadding carefully so as not create lumps- work them out if you notice them building up.

Sew up using ladder stitch, this will be much neater. Push needle in, work a few millimeters through the fabric, come back out, exactly opposite on the other fabric push needle in and work the same. This is basically a square zigzag pattern.
The body is now complete, the fun begins with embellishing...what will you choose?

As I am determined not to go and buy any goodies, namely pretty little flowers and ribbons, I shall be hitting my stash of materials to see what I can come up with.
I always have felt, so I shall use that to create some small buds and leaves.
Leaves are simple to cut. The flowers are circles in a variety of colours to match each side.

Sew a circle round the felt, draw it tight and knot. This will create a flower. Pulling the thread less will create a more open bloom.

I used an open florists ribbon to create the sash, then sewed the spring coloured flowers and leaves over it.


I should probably have created the faces first, but honestly, I was still deciding how best to make them- use fimo, silk or the faces I cast in a previous post...
In the meantime I can finish everything else. I made the skirt on a piece of organza for stability using a mix of ribbons and organzas. I then added sequins and beads to finish and sewed them on each side. trim the ends of the ribbons diagonally to help stop fraying. I also add a little clear nail varnish.

I decided to paint the faces in the end so I used fine tip pens to colour little faces. Not my favourite faces, but sweet enough. I will fimo some more once I can create a cute face, which may take some time!

It's a good job I rarely throw anything out so I have an abundance of threads, wools and fibres to use. Choose your colours accordingly and cut lengths to about 5 inches, not all even lengths.

Sew a piece of ribbon for hanging at the top of the head. Then sew the spring coloured wools to the top of the spring side. Loop through several times for security. Sew a securing loop round the wool halfway down the head each side to draw the wool into the face.
Turn over and repaet with the autumn wools.

You can braid, tie or trim the hair to your preference, add beads or butterflies...
I think these are finished now... I was debating adding a crystal necklace, but think it will make them too busy.

I just hope my swap partner likes her...

****************************************************
FABRIC DOLL with arms and legs
It's a little more complicated than the dolls above, but not impossible if you take your time. You will need the same materials, but more fabric for the arms and legs, and a small bead-type stuffing for the arms and legs.

Lay out the paper patterns on your fabrics with right sides together.
This will make one arm and leg. Mark the arm and leg pattern with a cross in pencil.
When you pin for the second arm and leg make sure the paper pattern is turned over, otherwise you will cut out two left legs and arms. The cross should be on the underside.
Add 1/4 inch for the seams.

All the pieces laid out to check arms and legs are symetrical.

As before, clip small triangles close to the stitching. Where you are creating points cut straight across the point near to the stitching to stop bunching up.

With a knitting needle, very carefully push the hand through the arm to turn the right way. If it is difficult to get the points turned you can pick very gently with a sewing needle, drawing it out bit by bit.

I use these glass beads for my artwork, but they are purpose sold for doll-making- lucky me, I have 3 sizes, sand, 1mm and 2-3mm!!


This is by far the fiddliest part, please take care to make sure you have this right before you sew.
If you are using one colour fabric placement will not be so important.
The arms and legs must be pinned so that they face INTO the body. Fold out to check colour matches, adjust again until the feet, hands and colours are correct. Pin into place.
I machine these into place now to stop the beads coming out.

Pin the other body piece onto the first piece. Leave a gap down the side to allow the arms and legs to stick out.
Sew round using the 1/4 inch added for seam, running the machine foot next to the fabric edge will cover this.
Reverse a few times at both ends of the gap to stop the gap widening and the material fraying while you fill the body.

Clip around the edges, very close to the stitching, but being careful not to cut the stitching itself.

Turn the right way out, run your finger round the seam on the inside to push the stitching outwards.

The body can be stuffed with any soft material. Work through the neck into the head first. Do not overpack, and work carefully to avoid lumps. Tease them out if they begin to appear.
Embellish as required.

These pics show the completed body. I shall be using cast faces for this doll, and I haven't decided how I'm going to finish her yet.
I have made a skirt from organza strips and will bead it up before she is finished. This in will probably have crystal necklaces and bracelets, maybe the relevant zodiac charms... still deciding, but once she's done I will post the pics. I shall be making a Summer/Winter solstice doll to go with her at a later date.


These are the faces I had originally cast for my Bead Journal Project blocks but decided not to use.
They've been sanded down and the bubbles removed.
Cut 2 pieces of card slightly smaller than faces and punch holes all the way round. These will be sewn through to attach to the doll.

Position in the centre of the head and sewn round using invisible thread.

Sew a hanging ribbon in the centre of the top and then gather up the wool for one side. Sew round a couple of times to gently hold in place, then turn over and add the other wool collection to the other side.

The faces are made from resin plaster so will be stronger than plaster of paris. They will take paint well.
I'm using acrylic colours that match each side and will accent these with my favourite Golden irridescents.


Pull the hair round the face and glue in odd spots to hide the card. I will also touch up the white edge if it shows in places...

Here are both finished faces.... she looks great hanging up, but I still need to dress her and I'm not sure how yet... I'll post pics once she's done.
If you give her a go let me know, I'll post pics in the gallery!!
*****************************************************
CANVAS POSTCARDS
On the Milliande and Stitchinfingers communities members host some fantastic swaps, and this year I'm hosting the Milliande's Birthday card swap. Anyone can join and play!! Although I will warn you- once you get started it is VERY addictive!
Have a look over- there are lots of styles and materials to play to your hearts content, but this year I'm playing with embellishing and printing on canvas. I buy mine at the Works on a roll- very handy for sizing.
You will need canvas (I always cut much larger than needed, so I will have spare for the future), pigment inks or acrylics, stamps and stencils, stickers, beads, angelina fibres, embroidery threads and anything else you fancy.

I printed these in the same way as the book cover tutorial using the above materials.
Once printed and dried I use a needle and fray the edges several threads deep. The gesso will need scraping away from the cotton fibres.

Choose cordinating angelina/crystalina fibres. I am working to a peacock theme for these 4 cards.

Cut, lay and arrange the fibres, cover with greaseproof paper and iron with one pass. More than one pass will alter the colours so check as you go and record for later reference.

Cut the decreasing sizes of ovals for the feather pattern.
I use Golden gel medium to attach them in sequence, although I could dispense with this as I will be stitching later anyway.

The first element completed.

Choosing apprpriate colours over stitch each section to accentuate the feather fronds. Add beads as required.
I use running stitch along elements of the stamping to emphasise the swirls, and bunch seed beads along the stitching for extra glitz.

These are 2 of the peacock ATC's, but the basic idea can be adapted to any colour/ theme, depending on your materials. Below are cards with machine stitching and embossed foil (The back of which is packed with modelling paste to prevent the raised elements being squashed flat) and gel medium transfered images/text.


*********************************************************************
HEART SCENT POUCH
As part of an annual Xmas swap on Milliande's Palma has set up an Xmas Goodies Box Swap What a wonderful treat for someone at crimbo- a boxful of handmade goodies!! There's a whole list of great little nicnacs to create and personalise...my little Personal Pocket will be going in, as will this little treasure, a lavender scented heart.

You will need ribbon of various colours and widths- I'm using organza for this project. You'll also need 3 baby wipes (or cotton fabric), pins, scissors, paper heart template to fit, thread and filling.

Pin out horizontal ribbons onto the wipe/material. Keep the edges pinned close together, the middle will spread out a bit, but will be okay once stitched.

Starting in the middle, begin weaving ribbons across the horizontals. Work out to the sides. This can be really fiddly- it is worth taking your time....

If you want you can tack the ribbons at this point, but I'm incredibly lazy (much to my tailoring-teaching mum's horror!) so I'll leave the pins in.

Fold a wipe (or piece of fabric) in half and place over the ribbons halfway down.

Do the same with the last wipe (fabric), overlapping by at least 1 1/2 inches.

Cut a paper heart that will fit within the ribbon boundaries. This can be cushion size if you are working on a fabric base, wipes are just such a handy size for these little pockets.
Pin in place....

If you haven't tacked the ribbons in place, trim the top wipe so that you can see the pins, they will be taken out as you sew round the template.

Using running stitch work around the template. It will not matter if you clip it as it will tear away later.

Once you have stitched all the way round, remove the template. Trim the layers to about 6mm, then trim the top layer a bit closer still- these stops a bulge developing once turned out.
You will also need to cut little triangles out of the layers on the curved sections, again to aid turning.
Trim across the bottom of the heart to reduce excess material there.
Always cut CLOSE to the stitching, but not into it!

Turn the right way, checking that the edges are completely opened to the stitching. At this point I might oversew for decoration and to keep the shape.
You can also embellish any way that you like- I will be adding a loop and bows....
Et voici, c'est fini....

Fill with whatever dried flowers you like- or pot pourri. They should stay tucked well in because of the deep overlap in the back, but you could lighly tack the opening closed. This can be refilled every year and will be a lovely little sachet in a wardrobe or drawer.
*********************************************************************
PERSONAL POCKET
I love making these little bags- they are so quick and easy!! And so useful... one favourite use is to keep certain female products tidy in my bags- there's nothing worse than dropping your bag only to have little plastic tubes roll across the floor!!. or have your friends rummaging for your keys and finding rolled up liners...some things are best kept discreet.
These can be made to any size if using typical materials, but if you are on the recycle route you will be limited to the biggest babywipe you can find- although you'll still get a days supply in a pocket that size.

You will need a painted/inked wipe, stabiliser,cotton lining,threads, angelina, beads and embellishments as required.

I used acrylic inks to colour this wipe. Colour as you wish and allow to dry. You can iron if required, heat between greaseproof sheets.

Cut the stabiliser to around 1cm smaller than the wipe.I use fibre cleaning cloths, but any stabiliser will work to help embellish the wipe which is too thin on its own.
Pin in each corner and turn over.

Pre-fuse the angelina in colours of choice, then rip and place in appropriate areas.
Zigzag in a similar colour thread to hold the stabiliser in place. Try to catch some of the angelina to hold it in place.

Embellish all over with a variety of stitches and coloured threads.

When finished turn the work over and pin to the lining. I am using a piece of old school shirt.

With a running stitch sew all round close to the wipe. It is best to start along the side and leave a 1 1/2 inch gap for turning inside out.

Trim the lining and the wipe close to the stabiliser. It is best to cut the wipe slightly closer to the stitching to prevent bulging seams. Cut across the corners.

Using a knitting needle end carefully push the corners through the gap left in the seam. Use the point afterwards to define the corners.

Pin the edges of the gap so they follow the lines of the main pieces. This can be hand sewn, but it will be joined when sewing the main seam shortly.

With the right side facing you turn down a 1 1/2 inch flap.

Fold a larger flap allowing for an overlap of about an inch. Pin in place.

With a running stitch sew up and down the sides making sure to catch the turned edges of the gap. I usually run three times beacuse it can be quite thick and my machine struggles over bulky areas. (It's still going well after 20 years, so will forgive a few little niggles!)

Turn out the right way, use the knitting needle to push the corners square.
Embellish with beads and ribbon if required, but basically this is finished and ready to go!
And if I hadn't spent an hour embellishing the wipe layer it would have only taken 15 minutes to make!!
*********************************************************************
PRAYER FL-INCHIES
These can be made in any number of materials- plastic, wood,glass,material or a combination. The concept is to use the squares to impart a message- this can be short and sweet, symbolic or pictorial... mine is a gift for a friend so is a specific message. Choose your materials accordingly.

I am using baby wipes and acrylic inks as a base for my inchies.

Several inked wipes. I'm planning on doing a second for the inchie swap...

I use heavy roofing underlay as my stabiliser, it is robust and lightweight. Pin the wipes onto both sides of the wipe and baste or machine all the way round.
I have place prefused angelina fibres over the front wipe.
Using complimentary coloured threads I sew randomly over the entire wipe, this will also secure the layers.

Having sewn down either side of the marked inch lines I then cut between them for the squares.

Depending on your theme, lay out the pieces and arrange them till you are happy with the balance and embellishments.
Sew the beads, buttons, ribbons in place on each square. In this instance I have used transparent thread.

Once all the pieces are finished it is time to decide on the hanging system. In this case I am using simple ribbon sewn down the backs of the squares.

A bar is needed to hang the ribbons, so I covered a bbq skewer with ribbon and plaited embroidery thread to make the threading.
Sew the ribbons over the bar at equal distances and diagonally trim both lengths of ribbon.
I always use clear nail varnish to fix thread ends and knots. It will also hold the ribbons in place on the skewer.

So there it is- breathe, live, create in prayer fl-inchie form. It will be flying off soon...
*********************************************************************
PRAYER FLAGS
My prayer flags usually involve felting in some manner, but I often add other less likely materials too!

You will need a base material- coton, muslin,garden fleece, or silk, wool tops in your colour sceme, wensleydale curls, thread, material, angelina fibes, medium copper foil, felting needle, polystyrene, pins and beads.

Pin out the base onto the polystyrene block (needs to be at least 1" thick or you'll stab yourself- quite painful- honest!!)
Lay out your wool tops in a graduated scheme, as thick or thin as you like. I lke to keep it light at the top and get heavier as it gets darker- gives more weight to move)
Begin to needle the tops into the base.

Carry on building up until you are happy with the depth. Unpin and turn over, briefly needle to send fibres through to the front.

Turn right way round and pin again. Begin to add curls along the bottom of the base material. I trim little lengths and add them all over for extra texture and contrast.

As this is part of a series I cut the appropriate colour material for the body and head.
If adding angelina fibres, preform the fibres before adding to the flag. Layout your fibres between greaseproof paper and heat gently with an iron until fused)

Place the fibres over the wool, and then situate your material pieces where you want them. Pin in place, then work round with running stitch to secure. I use beads as well as metallic thread at this point.

For the symbols in my series I am using foil. I cut out the relevant shapes and emboss using an embossing tool with the foil on a spongy pad. They can also then be painted with paints or sharpies.
As it is quite a light foil it can be attached with a sewing needle and thread.

Fold over the top allowing room for cording. Sew along to secure, trying not to show through the wool.

As mine are being displayed as a group I have chosen to wire them together, then the links are adjustable.

The Elements series complete; Earth, Air, Water, Fire, Spirit and all 5 combined.
*********************************************************************
INCHIE/ TWINCHIE BOX
These inchies are special- they are for swaps, so they need to be posted flat, and a mechanism to assemble them included in the design. We came up with several workable solutions for the closures, but I'm sure there must be more...


Gather your materials depending on your chosen theme/colour scheme. You will need a base for the tile- any shape you like, embellishments, threads and closures.
I am using remnants from a previous felt project, embroidery silks,beads and transparent thread.
To strengthen the felt and make joining easier I have blanket stitched the edges with coloured silks.
Join together in a cross to shape the cube later. If this were to be a solid cube I would sew up the sides now.

Embellish as desired. I also added beads on opposite corners and corresponding loops to allow later assembly.

Et voila- c'est fini!!
What fiddly fun!!
*********************************************************************
FELT SATCHEL
I promised I'd post the pics of how I made my art bag...so here they are.
This used @ 500g of merino tops, and similar in hand-dyed wool. Other materials you will need are;
bamboo blind, bubblewrap, netting,olive soap, polystyrene template, strapping, closures, embellishments as required.
Cut polystyrene @ 1/3 bigger than end size. Layout bubblewrap, netting and former. lay wool horizontally then vertically over former. Wet down with hot water and soap, place net/bubblewrap over and rub gently at first.When fibres are lightly knitted and not moving around too much, carefully flip the whole assembly.

Fold wool over back and layer as before. Wet, soap and rub till lightly felted. Turn again...

Repeat the layering, wetting,soaping and rubbing process in white once more, both sides, rubbing longer and firmer each time. Turn over....

Add coloured wool in same way, wet and rub both sides. When layers are well knitted remove netting and just use bubblewrap, you can really rub hard using that.

Once both sides have been done you will need to cut out the former. Start slightly less than 1/3 from the top and cut across the width, then up and around the edge of the former.The remaining felt will become the flap. At this point it will be fairly floppy and care should be taken when handling.

Working by hand work edges and corners to strengthen them. When felt tightens cut a piece of bubblewrap to fit inside the bag and flap. Lay out the roller blind, then roll bag up in it. Roll 50 times, undo and turn 90 degrees for equal shrinkage. Keep doing this till it is well felted together and the size you want. Roll it up and throw on the floor a few times, changing direction of rolling to keep it even.
When it's how you want it, rinse, then soak in vinegar solution to neutralize the soap. Shape and dry.
The rest is up to you...for finishing touches and straps etc...
This is how this one was finished...

I sewed strapping all around the sides and bottom for strength and support.

I dry-felted the spirals onto the front and back.

To finish inside I handsewed a natural lining, added strapping loops and sewed/dyed a matching strap.

I made matching felt buttons, and plaited wool loops for an adjustable length closure.
All in all it took 2 days to make, as I left it overnight to dry in shape, but actual working time was closer to 6-7 hours.
Well worth the effort- it's still going strong after 2 years of abuse!

If these quickie tutorials have inspired you to try something new, have fun, and let me know. Share your experience too! I'll even set up a gallery page to show your work.
Great photos and explanations. Loved seeing all your special pieces. Love your use of color and texture.
ReplyDeleteThanks Ruth- Love your work too!
ReplyDeleteYou are amazing and so full of energy! Wow!
ReplyDelete