
Over 2013 I shall be embarking on some more experimentation with altering fabric- by printing, dying, shibori, marbling, sun-painting... or whatever takes my fancy!
I'll be taking photos and making notes along the way and posting them here, so bookmark the page and check back each month to see what joy I've been making.
List of tutorials; top of page newest
January- Snow dyeing
February- Marbling, to come- redoing pics..
March- Printing with fabric paint
April- Shibori dying
SHIBORI DYING
Materials you will need; Cotton, silk or other natural fabric, strong thread, suitable dyes, salt, and soda ash.
There are many official patterns for shibori, but really any tying or gathering stitches that you may have seen or used will probably be a type of shibori, remember tie-dying as a child?
 Wash the fabric first.
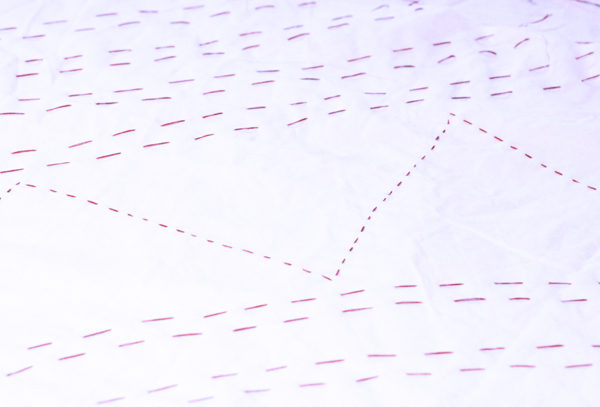
Draw wavy lines on your fabric then pinch the line over and sew tiny running stitch close to the edge. This will give a row of tiny double undyed spots.
With a knot at one end, gather all the strings tightly and tie off.
 For a typical tie-dye circle pinch a spot, gather the fabric into a point then wrap with thread. Wrapping around the fat end will give a clean circle, wrapping up to the point will give a varied circle.
 Sew running stitch in several circles, then gather and tie. This will give a similar circle to the wrapped style, but with more defined lines.
I mixed this with pinched lines for a varied look.
 Straight lines will give a sand dunes effect. The zigzag will give an alternative design.
 Regular straight lines will give an effect like sand dunes, or brains. Watch out for the final pic to see what I mean...
 Gather stitches can be used on any shape, here I've made a flower, and used the pinched stitching to create a leaf.
 Gather all the threads and tie off tightly. Once soaked these are now ready to dye.
 Soak the fabric in a soda ash mix, 100g to 1 litre, and mix your dyes if necessary. I'm using cold reactive Procion MX dyes, so I'm mixing ! tsp with 3 teaspoons of salt and 50-60 ml of warm water into a squeezy bottle.
 Squeeze or paint the dyes onto the fabric however you wish. I have done each square in a different colour combo and layout.
 I find that I only need to leave these a short time because you don't want the whole thing coloured and there is very little resistance due to the small amount of sewing/ gathering. 5 mins max, then off to rinse in cold water. Once it is running clear make the water hot.
Pop the stitching and undo, my favourite bit, because you really never know what you're going to get!
 The circles undone
 The circle wraps
 The flower and leaf
 Circles and running stitch
 The straight lines
 The wavy lines
I love how most of these have turned out, but next time I will make sure I use a strong thread rather than doubling up on a normal sewing thread- it does still break!!
I was halfway through opening them up when my daughter saw, and now I'm halfway through her t-shirt... which should go really well because it is 100% cotton.
************************************************************************
PRINTING WITH FABRIC PAINT
Materials you will need; a natural fibre fabric, washed to remove any chemicals, a variety of fabric paints, pastels, or acrylics mixed with textile medium, brushes or sponges, brayer and plate, stamp of some sort- lino, silicon, potato and an iron.

I am using quite a nice weight 100% cotton, a variety of pebeo opaque and dylon paints, and some lino cuts I did over the last year for other projects.
 I want my colours to blend so I am soaking the fabric with plain water. Using a brush or sponge work your chosen colours in stripes, spots or shapes.
Set aside to dry. I hung mine on a radiator which is why the blending is directional. Make sure you put a towel under the fabric, it will drip unless you let it dry flat.
 Put a small amount of paint on a plate and roll out. Choose your stamp and roll the brayer over it until there is a smooth, thin covering of paint.
 Place your stamp and rub over it. I find that if you only rub /brayer the stamp it doesn't always print fully, but if you carefully pull the fabric up you can then rub the fabric onto the stamp.
 Continue your pattern, varying the direction for more interest. Let it dry again.
 Once dry, using a high heat, iron over the back for a minute or two to set the paint. It will then be washable and lightfast.
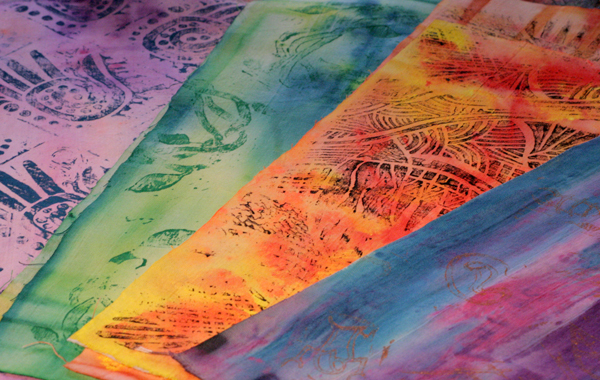
 A variety of base colours and designs. If you have your materials out you might as well may a few variations at the same time for your supply stash, all good fun!
************************************************************************
MARBLING
I usually marble with oil paints diluted with white spirit, but for this swap I used a set of marbling inks I had bought some time back. Unfortunately, despite following the instructions the inks did not dry very well of their own accord, and took some serious coaxing using paper and an iron to remove the greasy residue... so I am going to do a batch my usual way and will take pics along the way.
************************************************************************
SNOW DYEING
Materials you will need; Procion MX dyes for cold water dyeing, salt as a fixer, soda ash for treating fabric, natural fibre fabrics (not animal), pots or bottles, bands or string.
Equipment you'll need; containers to hold the fabric and snow, cooling rack or similar, bucket, mask, gloves and goggles.
DYES ARE VERY FINE PARTICLES- Always use safety equipment when mixing, and take special care to mix/contain them with as little agitation as possible, you do not want the particles suspended in the air while you work, it can be detrimental.
Also, once you have used equipment for dyeing DO NOT use it in any food situation again, keep it for dyeing- or use old equipment in the first instance.
Soda ash will dry and split your skin if you do not wear gloves while dealing with it.
 The fabrics need treating to help the dye bond. Mix @200g of soda ash into 2-4 litres of warm water. Wearing gloves, make sure the soda is completely dissolved.
Leave to soak for at least 2o mins. I left them for an hour while I gathered everything else and mixed the dyes.
The liquid can be saved and used in future projects- be careful while decanting.
 As these are small bottles I am mixing 2-3 teaspoons of salt with warm water. This helps deepen colour and fix the dyes. With gloves, goggles and mask, very carefully open your dye containers and spoon 1-2 teaspoon into each bottle. Fill to the top, cap and shake well.
 Once the particles are suspended in water they will be less harmful, but if you do get a spill please still be careful. I threw one of my pieces of fabric over the tray to use/ soak up the dye- no need to waste any!
 I didn't have any non-food containers free so I improvised. Don't tell the kids!!
I used trivets as my grid, this allows show to drip without the fabric sitting in a mucky puddle.
 Gather up some snow... ours was slowly disappearing so I had to get what I could from all over.. leaves included, not to worry!
 Wearing gloves, remove and squeeze the fabric dry. You can totally dry the fabric for later work if you want. Dry fabric allows less mixing/stronger patterns.
Decant the liquid into a container to also use again later.
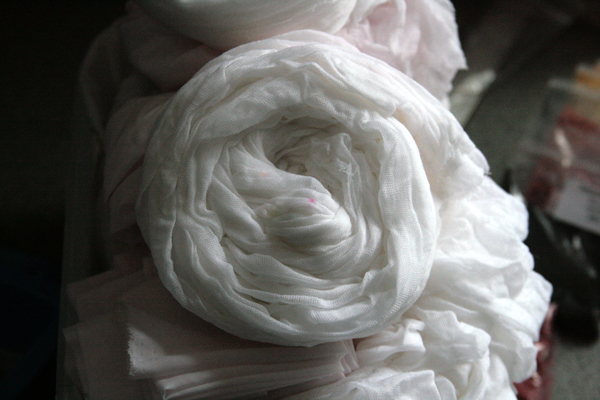
Roll, fold, pinch the fabrics in whichever way you please.
Lay out on the trivets.

 Cover the fabric with snow. Vary the depth if you want even more variety in mottling, as thicker areas will take longer to melt and allow a wider subtlety of blending.
 Shake the dye bottles again, and squirt over the snow. I have created 3 colour combinations because I have 6 pieces of fabric under there.
I did separate combinations for the smaller tubs.
 Leave for 24 hours, if you can!
When all the snow has melted take each piece of fabric and rinse in cold water only. Once it runs clear rinse in warmer water several times.
You do not need to heat fix, the soda ash and salt should be sufficient. Add more salt in your next attempt to see how much stronger the colours could be.
 Once rinsed hang out to dry, iron, stash or use.
If you have rinsed it well enough you shouldn't need to worry about washing with other items... but it might worth being cautious the first time.
 One of the finished pieces, a poly-cotton, which takes dye less than 100% natural fabrics. Great for a light shirt or quilting.
 This is a section of the bamboo piece I threw over the dye/salt in the mixing tray. Alot of colours make brown, and it did, but hey, with all the mottling and gaps it actually came out really nice.
 A close-up of a concertina'd and folded piece. This will be great as a shirt border...
Our snow has all but gone now, so my next batch will have to be with ice instead...
List of tutorials; top of page newest
January- Snow dyeing
February- Marbling, to come- redoing pics..
March- Printing with fabric paint
April- Shibori dying
SHIBORI DYING
Materials you will need; Cotton, silk or other natural fabric, strong thread, suitable dyes, salt, and soda ash.
There are many official patterns for shibori, but really any tying or gathering stitches that you may have seen or used will probably be a type of shibori, remember tie-dying as a child?

Draw wavy lines on your fabric then pinch the line over and sew tiny running stitch close to the edge. This will give a row of tiny double undyed spots.
With a knot at one end, gather all the strings tightly and tie off.


I mixed this with pinched lines for a varied look.


Pop the stitching and undo, my favourite bit, because you really never know what you're going to get!


I love how most of these have turned out, but next time I will make sure I use a strong thread rather than doubling up on a normal sewing thread- it does still break!!
I was halfway through opening them up when my daughter saw, and now I'm halfway through her t-shirt... which should go really well because it is 100% cotton.
Definately give this a go, it is so worth it!!
************************************************************************
PRINTING WITH FABRIC PAINT
Materials you will need; a natural fibre fabric, washed to remove any chemicals, a variety of fabric paints, pastels, or acrylics mixed with textile medium, brushes or sponges, brayer and plate, stamp of some sort- lino, silicon, potato and an iron.

I am using quite a nice weight 100% cotton, a variety of pebeo opaque and dylon paints, and some lino cuts I did over the last year for other projects.

Set aside to dry. I hung mine on a radiator which is why the blending is directional. Make sure you put a towel under the fabric, it will drip unless you let it dry flat.


************************************************************************
MARBLING
I usually marble with oil paints diluted with white spirit, but for this swap I used a set of marbling inks I had bought some time back. Unfortunately, despite following the instructions the inks did not dry very well of their own accord, and took some serious coaxing using paper and an iron to remove the greasy residue... so I am going to do a batch my usual way and will take pics along the way.
************************************************************************
SNOW DYEING
Materials you will need; Procion MX dyes for cold water dyeing, salt as a fixer, soda ash for treating fabric, natural fibre fabrics (not animal), pots or bottles, bands or string.
Equipment you'll need; containers to hold the fabric and snow, cooling rack or similar, bucket, mask, gloves and goggles.
DYES ARE VERY FINE PARTICLES- Always use safety equipment when mixing, and take special care to mix/contain them with as little agitation as possible, you do not want the particles suspended in the air while you work, it can be detrimental.
Also, once you have used equipment for dyeing DO NOT use it in any food situation again, keep it for dyeing- or use old equipment in the first instance.
Soda ash will dry and split your skin if you do not wear gloves while dealing with it.

Leave to soak for at least 2o mins. I left them for an hour while I gathered everything else and mixed the dyes.
The liquid can be saved and used in future projects- be careful while decanting.


I used trivets as my grid, this allows show to drip without the fabric sitting in a mucky puddle.

Decant the liquid into a container to also use again later.
Roll, fold, pinch the fabrics in whichever way you please.
Lay out on the trivets.

 Cover the fabric with snow. Vary the depth if you want even more variety in mottling, as thicker areas will take longer to melt and allow a wider subtlety of blending.
I did separate combinations for the smaller tubs.

When all the snow has melted take each piece of fabric and rinse in cold water only. Once it runs clear rinse in warmer water several times.
You do not need to heat fix, the soda ash and salt should be sufficient. Add more salt in your next attempt to see how much stronger the colours could be.

If you have rinsed it well enough you shouldn't need to worry about washing with other items... but it might worth being cautious the first time.


Our snow has all but gone now, so my next batch will have to be with ice instead...
No comments:
Post a Comment
Hi,
Sorry to add the verification box- I hate them so... but I've been getting alot of spam messages lately! Hopefully I'll be able to remove it in a while.xx