
Rather than fill the front page with lots of incremental photos I'll post tutorials here. This section will be dedicated to craft-based works.
The tutorial list; top of the page first
Paper Bags -recycled mags as gift bags
Gesso collage -layered gesso, heat treated and coloured
Moulding and casting- alginate and resin plaster
Heavy embossed tiles- MDF base, embellishments, UTEE


 Base complete.


 16 small and 16 medium bags completed from 1 roll of brown wrapping paper.


*********************************************************************
GESSO COLLAGE

 Continue to build up layers of gesso, it can be thick in places, and built up around objects.


 A completed piece. This will be a book cover rather than a wall- hanging. You could make boxes, albums, books etc using this method.
Have fun trying it out!!
*********************************************************************
PAPER GIFT BAGS
These bags can be made from any paper; newspaper, brown paper, magazines or handmade- whatever you have to recycle!! They are very easy to make and you will find a rhythm to making them in 3 simple stages.; cutting and glueing; folding and creasing; punching and tying.
You will need paper of a size you require for the finished bag- a typical craft mag spread will create a bag big enough for a typical paperback, an A4 sheet will take a CD case, larger glossies (RED etc) will take an A6 book. You can glue 2 sheets together to create a page-sized bag if you want to keep a page as a feature.
You will also need; scissors, knife, ruler, cheap PVA glue works fine (no need for expensive glues), string or cord and scraps of paper for reinforcements.
Optional; I always add a label and/or tag with a hand-carved recycled stamp and name, or my shop details etc- you could also add a "To/From" tag if you wish...
For ease of showing folds etc I have used a £1 roll of brown packing paper. I can get 16 small and 16 medium bags from this roll.

The process is the same for whatever paper you are using once you have it cut to size or removed the staples from a magazine.
Here I have cut strips 10 inches wide from the roll. The larger bags are cut 17 inches wide.

Flatten the paper out and fold in half. As a basic bag the join will be centre back of the bag, but I'll show how to hide it in the sides later on.
Run a line of glue all around one edge of the paper and up the centre by the fold. Place 2 rectangles of scrap paper (or one long one) near to the fold. Carefully fold the paper over and glue down.
If using a single sheet of magazine just fold over the top 1 inch and glue. You can reinforce if you like on bigger bags.

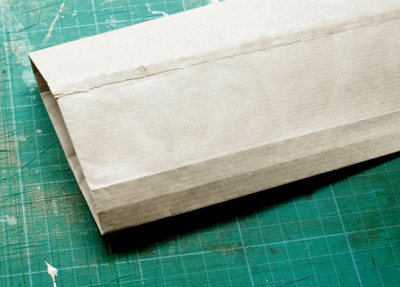
Fold over around 1/3 of the width, bring the other edge over so it overlaps by 1/2 inch. Gently crease both new folds.

Run a thin line of glue along the lower edge. Refold the upper piece and press together.
I make a stack of these and set aside to dry a bit before the next stage.
By the time you have completed all the pre-glued pieces, or all the magazine spreads, the first ones will be ready to fold.

You will not need to make any measurements or marks to ensure correct folding for the sides. With the reinforced edge to the left, hold the tube in both hands near the crease and gently crimp the edge about 1 cm from the original crease. Align the top edges so they are level and flatten out to create a crease on the far edge. Continue the crease from the first crimp. This ensures a square and even finish. Turn the tube around 180 deg, and do the same again creating a new crimp on the opposite side of the original crease. Flatten and crease far side.
This gives you 3 creases, equal on both sides of the bag with the seam in the centre.
Alternatively, especially if you are joining two sheets together, you can fold so the seams are hidden in the sides.

Fold the first crease close to the cut edge of the join. Again make sure the top of the bag is aligned so that the creases will be true and square. Crease down both sides. Following the same procedure as before create a further 2 creases either side of the first crease. When folded the join will be hidden within the gusset.

Loosely holding the top reinforced edge, gently push the centre crease into the middle of the bag. Once the end has folded in you can just run your finger along and it should collapse inwards along the fold. Sharpen the creases with a bone or scissor handles.
Do the same the other side.
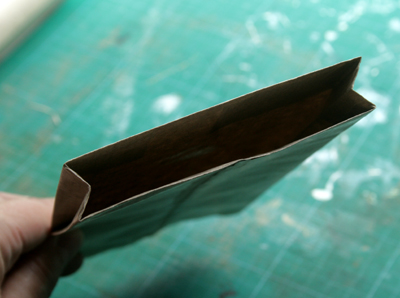
You now have a gusseted tube.

Fold the bottom 1 1/2 to 2 inches of the bag up (depending on the size of bag- you can adjust later if necessary)
Crease well.
Now for the fiddly bit!!

Stand the folded section upright and open up a bit. I find pushing my finger or a folder into the corner helps create a tidy, accurate corner. Push gently with your right index finger along the central crease making the paper fold onto the bonefolder. If you align the crease of the triangle with the crease of the base you will get tidy corners. Once the triangle has collapsed enough follow the lines out until it naturally forms a box. Repeat the other end.

Once the upright boxes are formed the natural progression is for them to collapse into the centre. Crease them over to flatten them out.
THis bit can take a bit of practice, the important thing is to get the creases lined up- all will follow properly if you do. It's no great hassle if they don't, but it makes a better finish. If they are out of line undo all the folds back to the simple tube, then refold in the new positions to adjust the angles.

Fold the first section over at the natural point where the inside triangle finishes. Do the same for the top section. Sharpen the creases. Open the top section and glue across the top edge and add a spot on each side triangle. Fold over and repress.


If the bag is narrow you will need to open the gussets to fit the punch in place. Bigger bags can be punched still folded. Make sure the punch is central. It should be punching into the reinforcements glued in earlier.

For the handles I use a natural hemp. Measure out one length long enough to be tied behind the holes and create sufficient handle length- around 6-8 inches. Cut enough to complete each bag.
As you can see I never work alone, and string is always a great incentive for their interest!!

At this point point you can also add any tag that you may want. To complete I add a sticker


As you can see magazine pages make lovely bags, especially if you use those related to your products. Different weights create different strength bags so reinforce as needed. I also added my tags with my own carved recycle symbol and name stamps.
Have fun with yours and get into making the most of old stored mags....
*********************************************************************
GESSO COLLAGE
These collages can be made with any number of materials used as the textural bases, as long as the gesso is sufficiently built up to bubble under heat. I have used feathers, skeleton leaves, sequins, wooden, foam and paper shapes, and sticky tapes. The base can be any thick card such as mountboard/matting or small canvases.
You will need; items for texture, a board, gesso, acrylic paints, brushes or sponges.

Using gesso glue your items on the board. Lay flat items first- such as the leaves, feathers.. and build up layers. I add sequins after the leaves and shapes if I am using them.
Apply another coat all over and allow to dry completely.
 Continue to build up layers of gesso, it can be thick in places, and built up around objects.
Once you are happy with the layering use a heat source to bubble the gesso. I use a craft gun. The longer you hold the heat to it the bigger the bubbles will be, depending on what is underneath. Plastic and wood objects will allow it to rise, while material will grip the gesso more. Play in small areas to see the outcome and move around till you find a balanced picture.
Once you stop heating you can prod and press the bubbles, they will also slump on their own as they cool.

When you are happy with your bubbling lay a base coat of white acrylic paint over the entire canvas. You can still heat at this point if you want to adjust bubbling.
Begin to colour your work using colours of your choice. I find that 2(3) similar colours work best, magenta and purple, pink and red etc... I brush lightly and half dry, building up light layers, not blocks. This gives a greater depth later on.

These layers can take some time, keep working over areas until you are happy with the blending.
Use the darker colour you have chosen to create an obvious shadow in and under thicker objects. Use these as your feature elements. Make the paint quite wet and hold the canvas upside down. Dribble the paint around the base of the objects. Once it starts to dry you can wipe at the edges to create a softer edge and blend into the background.
Continue darkening the shadow, and building up the background with a dry coloured brush, swish gently over the raised details of the leaves etc to give highlights and shadows. Continue in this way until you are happy with the look.

This shows the depth of colours built up. The main colour is pink, using scarlet as as shade and purple as the complimentary colour. If you are unhappy with an area it can be overworked again and again. I also built up lighter areas using white to create balance.

These shows the detail of the dry-brush layering on the background and the build up of shadows and highlights with the paints.
The more layers of paint you add the more texture is created as long as you don't wet brush the complete area.
Once happy, I highlight with irridescent Golden paints in silver and violet/pearl.

The houses on the second piece, built up in the same way with a small palette, dry and wet brush strokes, and over highlighted with irridescent paints.

Have fun trying it out!!
*********************************************************************
MOULDING AND CASTING
I needed to make a large number of faces for a beading project, and having made the (not-so-perfect) originals in fimo I needed to make moulds so I could reproduce more. I couldn't get hold of my reusable moulding rubber (an excellent product in several grades) so I decided to use the alginate compound I had in my home stash.

I hadn't used this before so it was a learning experience.
You will need a measuring spoon, jug,small container, the original item and the alginate.

Reading the instructions for the ratios, mix to the required amount.
I used 8 tablespoons powder to 8oz water which created enough to cover the noses sufficiently in 3 dishes. Mix water into the powder stirring vigorously for 1 minute.
The packet says don't worry about lumps, but to be honest the lumps caused problems later that were unecessary if it had mixed smoothly. Maybe use a blender next time?

The mix goes custardy very quickly so pour it as soon as the minute stirring is up. Unlike plaster you don't really get the opportunity to tap the bubbles out so bubbles can be an issue too. Stir slowly at the end to knock them out before pouring.
To check if mix is right get assessment from close friend!!

Leave the mould for 10 minutes until it sets, then gently prize the edge away with a knife and tip to allow the whole mould to fall away from the tin. Very gently pull back the mould and the original will pop up. Take care to remove slowly if you have recesses and intricate shapes.
Put the new casting aside, and continue to make more as required. These are good for 3 castings so I needed 4 of each shape.

Leave the alginate moulds to air dry a little. They will firm up more too, which will be better for casting- think custard to blancmange!
As normal plaster can be quite brittle once completely dry, resin plaster is a better option for resilience if you haven't got access to resin, dental plaster or UTEE. (I was considering UTEE, but thought it might distort the alginate, so will not use that until I recast with the reusable rubber compound)

You will need a mixing bowl, measuring spoon and resin plaster. Follow the instructions as to ratio for quantity required.
Make sure you add powder to water without stirring. After it has sat for 1 minute stir rapidly. Plaster can take several minutes to begin setting so you will have time to work with it, but if pouring, continually stir to stop the plaster settling again.

I made a large quantity up for the first batch as I wanted to make other shapes too. Little hearts for a later project, and a layer of plaster on MDF tiles for scratchy/textural abstract pictures.
The plaster will set after 30 minutes so you can remove them from the moulds, and set to one side to dry out properly. They will go white and get lighter once they are completely dry. They can then be sanded, painted or carved.


Keep checking back to see how they progress in the Bead Journal Project 2012, and the tile art project.
*********************************************************************
HEAVY EMBOSSED TILES
As promised (sorry took so long Petra!) here is how I make my embossed tiles. These can be done any size, the one here is 3 x 3". The same process can also be done on perspex...with care, as it melts and bends.
You will need a base- wood,card,perspex, clear pigment ink and colours of choice, mica powders, clear embossing powder and colours of choice, elements to include in the layers-paper,wool,sequins,leaves etc, heat gun, rubber stamps, small brush and scalpel.

This is my base supply of materials, while deciding which little elements to include...

Use the scalpel to take off rough edges.
Evenly ink whole area with ink (I used white to cover the wood) and sprinkle with embossing powder of your choice, colour or clear.
It works well if you use colour on the first few layers, and clear once you start using embellishments. I do sometimes use white ink over embellishments to soften the look and add depth.

If you have UTEE you will be able to add elements at each layer- if using fine powder always add a second layer between, to both add depth and create a level coat.
This is one coat...
Heat sufficiently to go through the two stages- the first stage is a crystal looking stage, but still rough, as you carry on heating the rough bobbles will smooth out ( and becometransparent if using clear)

Begin to add your embellishments layer by layer...it helps to pop them on as you melt each section, use the scalpel to place them and tap them gently onto the sticky gel- it will be hot!!

After several more layers I begin to colour with alcohol inks, dabbing with a wipe till I'm happy with it

During the next melting I sprinkle/hold various angelina fibres, they will melt a bit so be gentle with the heat at this stage
The next layer I used two colours of mica powder, sprinkling it on when the gel is hot so that it sinks in.

Using a small amount of gel medium/hodgepodge I stuck a cutout heart in place.
Over the next few layers I concentrated on embossing and colouring the heart until it was covered and well blended

Once you have as many layers as desired ink up a stamp then heat the gel long enough so that sufficient area is melted- you will see the difference as the mica powders will move around rather than the crystals just becoming clear and smooth.
Hold the stamp over the position and place into the melted gel as soon as you turn off the heatgun. It sets quickly, even if it is still hot. Hold the stamp firmly for at least 20 seconds, then slowly pull away from the tile.

As you can see my first stamp was pegasus, but I didn't like the definition, it was too fiddly around the head.
If you are not happy it is simply a case of wholly remelting the gel again and use a new stamp. Bold edges work best, as you can see from this floral swirl.

These tiles can then be used as collage elements, joined as jewellery, hangings, plaques...your imagination's the limit really!
Enjoy!
If these quickie tutorials have inspired you to try something new- have fun, and let me know. Share your experience too! I'll even set up a gallery page to show your work.
*********************************************************************
No comments:
Post a Comment
Hi,
Sorry to add the verification box- I hate them so... but I've been getting alot of spam messages lately! Hopefully I'll be able to remove it in a while.xx