Saturday 29 September 2012

Vintage meets modern...

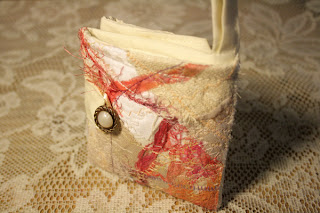
Well, it's certainly been a bag week, this week... yesterday I created a creamy vintage/modern rucksack with upcycled fabrics and some of my collaged textile fabric. I had some left over so made a little wallet too.


This bag is basically the same pattern and method as I've detailed in my rucksack tutorial over on my how-to's textiles. I don't use a pattern per se, I just cut to size and play, but the construction method is very simple to follow if you want to have  a go!  I'm doing a tute for the wallet over the weekend so I'll let you know when it's up and available. They make a lovely set, eh? What about making a matching personal pocket too? for all your ladies accessories... there's a tute for that over there too. Just grab some fabrics and get cutting... you'll love it!!


Tuesday 25 September 2012

Rucksack heaven!!

Oh, I finished it today, so it's had a bit of a road-test and performed brilliantly!! It's so comfy and fun... I might just put a bit of velcro in the inside pockets though, just to stop stuff falling out if I threw the bag around- well- it will happen at some point!

Here it is finished...


I've really enjoyed making this but I'm not sure if I would be able to justify charging £70/80 for it, even though it's taken 3 whole days to make because of the work involved... we shall see, I might list one on Etsy as a "special order" and see how it goes...
The tutorial is completed over in the how-to's textiles section. Have a go... post me a pic... any questions just email me- I'll go through it with you if you're stuck! 


Monday 24 September 2012

Rucksack in progress...

Well, today's been fairly productive... I almost got it finished- only the straps, eyelets and hoops to add. Here's how it looks so far...


I'm just typing up the tutorial so far, that will be added to the how-to's textiles page very soon, and tomorrow I'll have my bag completely finished.
As you'll see by the tutorial I tend to make things up as I go along- you really don't need a pattern if you understand the construction rules. If you want to follow the tutorial I began with 1m of 45cm fabric and quilted 60 5" squares for the main piece. I cut the bag the whole length of the piece at 16 1/2" deep. That should give you a gauge for the other pieces. The straps are the whole length and 4 1/2" wide. Pockets, flap and all the loops can be whatever size you like depending on how much fabric you have left to play with. 
Although I've reiterated this in the tutorial here is a basic list of pieces you will need from 2 1m pieces;

2x 36 x 16 1/2" main body
2x  14 x 5" base
2x 36 x 4 1/2" straps
2x 5 x 9" pockets or to size
2x 6 x 2" strap loops
2x 5 x 5" strap reinforcements
2x 4 x 2 1/2" loops

These should easily fit into 2 m of fabric- the straps, loops and reinforcements can be from one piece or both, whatever you decide.

Check back tomorrow for the completed bag...


Sunday 23 September 2012

More bags in the making....

This week I have been alternating cleaning the mess from the builders with sewing a couple of projects. I can't clean it all in one go- that plaster dust gets everywhere and it doesn't matter how often you wash down, it still reappears the next day.
I have made another rucksack, which has turned out so utterly sweet, but I can't post a pic yet because it is a pressy for someone who will see it if I post- so I'll post the pic in a week or so once I know it's arrived safely. All I will say is that it is beautifully cream, with LOTS of pockets and a piece of my collaged textile as the flap... 
In the meantime- for those colour junkies like me I've also been prepping for my new bag... I wanted funky, colourful, textile this time- my felted satchel has served me well for a few years now, but it's time for a change!
I love batik so I have quilted squares together, with the edges to the right side, then sewn ribbon down the seams to strengthen them...

My wrong side...
The right side before the ribbons...

I love the frayed edges, it's such a shame to hide them so I'm making a feature of them. I've backed this with a pre-quilted fabric also donated from my mum's super-stash. I haven't decided on the exact pattern yet, but I think I'll make another rucksack... I shall be photoing and writing it up as I go so there will be a tutorial in the how-to's textiles section in a while. Tommorrow I'll cut out and prep all the pockets, etc. so keep popping back to see how it develops...


Friday 14 September 2012

RETRO RUCKSACK

I promised my daughter, quite some time ago, that I would make her a school bag using some of the tonnage of 70's/80's material that my mum gave me when she cleared out her loft. As she was a dressmaker/teacher she stashed so much fabric and notions away, but over the years she has got rid of most of it.... the last donation includes so many gorgeous, heavy woven wool mixes and trouser weight fabrics that it's going to take me years to find a use for it all!!
I've separated it all into "not likely", "quite likely", "almost guaranteed" and "most definately to use" spacesaver bags. The most definately has alot of shirt weight cottons and polycottons in a variety of colours and patterns... so much choice, so little time!!
When I was 12ish mum made me a lovely bodiced summer dress with ribbon corsetry down the front and big frothy layers in coordinating dark cottons- imagine my suprise when I opened one of the bags to find another 3 meters of each stashed away! Mum never bought in halves, obviously- enough for a garment, then double it, lol! 


I don't use patterns much, and certainly not for a bag, but I liked this so much I am going to make myself a paper template because I'm going to use more of the fabrics to make some others. This one has a heavy plastic lining to make it waterproof, the inside is the stripy fabric with a couple of little pockets and loops for phones etc.
At first my daughter shrieked in horror that it was far too big, but I planned for it to hold 4 or 5 A4 folders and text books plus typical teenage junk, otherwise what's the point if you need another bag too? Once she saw it gathered up and the flap tied over it suddenly looked cute and adorable! 
I've started mine now- I made my felt satchel in 2009 and much as I love it, to me it's old and I'm desperate for a new bag, so I'm getting out my batik squares and stitching them together for one meter of fabric, and I'm going to print onto a purple marbly batik for the contrast fabric...I'll take pics this time and set a tutorial for it afterwards.
So keep and eye out- I shall be making a couple for Etsy at around £40, and if you have any suggestions what to make with the wool mixes I'd be interested to hear from you... maybe I should try it on Ebay?


Wednesday 12 September 2012

PYRAMIDS IN MY STUDIO...

Continuing on from mum's pressies, I got out some denim that I'd had kicking around and set about creating a few pincushions for Etsy. I wanted something original but useful, so I tried a cube, but felt it was too ordinary and bulky, and the pockets just didn't seem right... so I played with some other shapes and finally settled on a pyramid.
The pyramid gives me a chance to add a pocket using my collaged textiles which match the needlecases on one side, a ribbon on another to keep scissors, and a 3rd side for pins, needles etc. I get to decorate each side in a different way, but still keeping in style and colour. Each has a loop for carrying- you know how you always end up carrying too much at once when setting up for a project! I finish with one of my cute multi-coloured crocheted flowers.
Here's a few completed, they are so sweet I'm going to have to make one for myself, probably in the purple textile I collaged at the weekend while hiding from my kitchen ceiling! (Long messy story...)

Yellow, I keep set colours of textile in stock, but take orders for special combos


Each side in detail- ribbon strap, pin-side and textile pocket
 I shall be making more with the denim- I usually use coloured hessian, but I like the contrast! I feel some sewing sets coming on for Christmas- perfect gifts for crafty friends and relatives. I'm also going to start taking orders for personalised colours and detailing, adding an embroidered name to the ribbon, so if you're stuck for ideas then shoot over to Etsy and email me with your requirements... 


Monday 3 September 2012

Needlecase sewing set, mum's birthday pressie...

I'm sure I'm not the only one with this problem- what do you give  your mum when they can buy what they want themselves, and spent many years teaching dressmaking so expects perfection?
I'm trying to get her back into sewing now she's retired, so eventually I decided to make a couple of things that might inspire her to get the machine out again- a needlecase and a wrist pincushion. I usually use bright colours and funky patterns- but that's not mum, so I had to raid my stash...
I've added a step by step tutorial over in the how-to textiles section, pop over and have a go- they're really quick and fun to make- honest!!


I used a remnant of sea striped canvas, some felt for the pages and a few of my crocheted flowers. Needless to say I made one of my gift bags  to present them in, and huge sighs of relief when mum really liked them, and has agreed to make my daughter a hunting jacket to christen them- hooray!! 
Having seen her old tattered pincushion I spent this morning making a replacement ball pincushion in matching fabrics... hope she likes it too.


Sunday 2 September 2012

Sun, Sand and Cement

I've been meaning to make some stepping stones for my garden for a long time- just not got round to it due to other projects... but with hubby off for 2 weeks and nowhere to go I thought I'd use the time to do "my" projects and have a holiday too.

As a test run for the cement mix I did a sun and moon using molds from Ebay, but I think they won't be strong enough to handle foot traffic so I painted them up and decided to make a wall plaque for each. As I'm heavily into the Elements alot of my work is tied in to them, either just by colours or reference to the actual element, I thought it the perfect theme for the garden.


Acrylic paints cover cement beautifully, but I did paint a sizing layer of diluted PVA on first. Because I used a cement mix of 1 part cement; 2 parts fine sand and 1 part sharp sand, mixed with water and a splash of PVA to plasticize the mix, it settled into the mold nicely and I only had 2 air bubbles, despite some vigourous tapping to dispel any air!
The sun had some fine detail, the moon very little, and the celtic knots are shallow but with lots of detail. Even the knots came out well using that mix. These were also painted with acrylics. Once it's all together it will be waterproofed and sealed.

I laid out my pattern on a table to gauge placement and scale, then set up a trough using one of my silk-painting frames covered with thick plastic. This allows the concrete to be poured into a former that will be easy to remove and remain clean. I also used two straws to create holes at the top for fixing later- it would be impossible to guarantee drilling wouldn't damage the plaque or chip a section out.
I made up a stronger mix for the concrete; 1 part cement, 1 part fine sand, 1 part sharp sand and 1 part fine aggregate. I added PVA to this mix too. This was poured into the former, leveled with a trowel and the sun placed in the centre. With a little wiggling and pushing she settled in nicely and then there was the big rush to add the celtic knots and all the glass nuggets in their respective places. It set a little too quickly so I ended up gluing the tiny mirror tiles in some places. 

I think the overall effect worked out well enough, although I love precision and accuracy, sometimes it's nice to be rustic and natural, especially once it gets a bit weathered and mossy.


The coloured nuggets were sunk into the mix, but the clear were added later using an acrylic polymer medium. Once it was completely dry I used a Gedeo waterproofing liquid all over the plaque, and sealed with an acrylic gloss varnish.

This is the sun plaque finished, onto the moon soon... and then I will have the concrete mix perfected for the stepping stones. I'll be using the sun and moon molds again, but the glass will be sea glass that I've been collecting for the last few years.




Related Posts Plugin for WordPress, Blogger...