Showing posts with label ribbon. Show all posts

Monday, 22 April 2013

Butterflies, butterflies

  I know, I know, too long again! I'm going to have to set certain times to write my blog otherwise I'm just not going to keep up enough. I have been busy, always my excuse! 
  For those of you that know me, aside from working in rainbows alot I also tend towards purple... and use butterflies as a theme regularly, well I've found out this week that I'm not on my own. I've had orders for my collage textile journals, both purple with butterflies- wonderful, as I know my stash is full of suitable goodies.
  Without giving away my trade secret for construction here's one of the finished journals, all sent off and happily received

I've started to add little art canvases of my work too, just as an extra dimension, I know they're each unique anyway, but this makes them more so- I love making these journals!

Here's another one, a small Moleskine I made at the same time for the fun of it, I've listed it on Etsy now.


Now I need to finish the latest order... hope I get my machine back soon, after 7 months it's gone stupid and gone back to the shop, darn! 


Thursday, 7 March 2013

Mum's the word...

It's almost here... Mother's Day in the UK- isn't the US on a different date? Much as I love my mum she can be a pain to gift! She's an accomplished seamstress, has everything she wants, and has been given countless portraits, cases, books and accessories made by me over the years... every year gets harder to find something that will fit her needs and taste... nevertheless, I still would rather make something personal than buy a bunch of flowers!
While at the Bluebird Market this Tuesday I took some aida to start working on... drew "Mum" on it and began working in cross stitch. Once I got going it opened up the possibilities to how I'd complete it... the rectangle could be framed and the square could be turned into a heart.
So today I finished them both...


The question is which one do I give her? 

I decided Saturday morning when I wrapped the heart... thought it the better piece... so what shall I do with the other?


Monday, 4 February 2013

January and February B & CQ JP blocks

Woohoo!
Well they happened much quicker than I expected, but my eyes are telling me off! On Saturday I put my fabrics together for January and February blocks, then yesterday and today were spent adding the details.

I'll admit now, I was so keen to get going I've messed up my plan already! These beautiful tear-drop shapes were supposed to be orange/yellow, the red/orange were supposed to be the pointy top shapes... oh well, too late now- I'm not starting over, like last year! They kinda look like birds heads, which follows the flying theme, so I chose to add a couple of round mirrors to the stitching...
 Here's how they turned out... 

For the whole design and  more detailed pics pop over to the B & CQ JP 2013 section
I can't wait now to do the March block... I have one extra block- the body, so I could get on and do that early...


Wednesday, 14 November 2012

How many reindeer were there?

Even with my memory being great when I was younger I still cannot recall the reindeer names... I always miss one- or more! Just how many were there really?
Well, I have completed 6 so far... seems like a normal number for a set. How many sets I get made will depend on how quickly I get my other gifts completed.

Here is the fabric version, I have put a tutorial for them in my textile tutorial page. Why not have a go yourself? They don't take too long, but are well worth the effort. I shall be making a few more sets, and probably use a couple of different shapes too... well, it is Yule.


Monday, 24 September 2012

Rucksack in progress...

Well, today's been fairly productive... I almost got it finished- only the straps, eyelets and hoops to add. Here's how it looks so far...


I'm just typing up the tutorial so far, that will be added to the how-to's textiles page very soon, and tomorrow I'll have my bag completely finished.
As you'll see by the tutorial I tend to make things up as I go along- you really don't need a pattern if you understand the construction rules. If you want to follow the tutorial I began with 1m of 45cm fabric and quilted 60 5" squares for the main piece. I cut the bag the whole length of the piece at 16 1/2" deep. That should give you a gauge for the other pieces. The straps are the whole length and 4 1/2" wide. Pockets, flap and all the loops can be whatever size you like depending on how much fabric you have left to play with. 
Although I've reiterated this in the tutorial here is a basic list of pieces you will need from 2 1m pieces;

2x 36 x 16 1/2" main body
2x  14 x 5" base
2x 36 x 4 1/2" straps
2x 5 x 9" pockets or to size
2x 6 x 2" strap loops
2x 5 x 5" strap reinforcements
2x 4 x 2 1/2" loops

These should easily fit into 2 m of fabric- the straps, loops and reinforcements can be from one piece or both, whatever you decide.

Check back tomorrow for the completed bag...


Wednesday, 12 September 2012

PYRAMIDS IN MY STUDIO...

Continuing on from mum's pressies, I got out some denim that I'd had kicking around and set about creating a few pincushions for Etsy. I wanted something original but useful, so I tried a cube, but felt it was too ordinary and bulky, and the pockets just didn't seem right... so I played with some other shapes and finally settled on a pyramid.
The pyramid gives me a chance to add a pocket using my collaged textiles which match the needlecases on one side, a ribbon on another to keep scissors, and a 3rd side for pins, needles etc. I get to decorate each side in a different way, but still keeping in style and colour. Each has a loop for carrying- you know how you always end up carrying too much at once when setting up for a project! I finish with one of my cute multi-coloured crocheted flowers.
Here's a few completed, they are so sweet I'm going to have to make one for myself, probably in the purple textile I collaged at the weekend while hiding from my kitchen ceiling! (Long messy story...)

Yellow, I keep set colours of textile in stock, but take orders for special combos


Each side in detail- ribbon strap, pin-side and textile pocket
 I shall be making more with the denim- I usually use coloured hessian, but I like the contrast! I feel some sewing sets coming on for Christmas- perfect gifts for crafty friends and relatives. I'm also going to start taking orders for personalised colours and detailing, adding an embroidered name to the ribbon, so if you're stuck for ideas then shoot over to Etsy and email me with your requirements... 


Friday, 6 July 2012

I HAVE BEEN BUSY...honest!

Shock horror- it's been a week since I posted! I must admit it was my birthday on Saturday so the weekend was fairly off limits for crafting.... but I did spend earlier in the week turning skirts into summer tops for me. I had several indian skirts that I barely wore and decided to get some more use out of them... I didn't take pics but I can do for the last one...

I have been busy since then having a huge tidy up and in-depth sort out of my home studio space in lieu of shuffling disciplines between here and my studio in town... I shall concentrate on textiles and crafts at home, and my art/sculpture/ messy work at the studio. Isn't it amazing how much stuff you accumulate- yet you never have what you need! How is that? 

Continuing with my monthly fabric postcard swaps over at stitchin fingers I had two to create: Trees; and Hats and Bags

Here is trees


I've only done the zodiac wall hanging as a quilting project, and that's more applique, so this was an exercise for me, working out how to make a pattern, cut and sew to make it look right. I think I need  a bit more practice- how do you make sure it sews flat? I'll get the hang of it...
I also played with some embroidery stitches and added sequins for the leaves. My new machine has been great for the altering projects, but this is the first time I've tried satin edging on it... not too bad, a bit of tweaking and it should be perfect- saves me blanket stitching everything- woohoo!

Hats was suggested really early in the month so I jumped on that, and then it expanded to hats and bags... oh well, never mind. Like my previous shoe FPC I wanted to make this a postcard version, rather than an image of a bag. So here it is with pockets, flap and fixings... getting the hang of that edging too!


They've been sent off now- I hope they arrive safely...

I've also been beading my BJP blocks for my zodiac wall-hanging, Cancer, Leo and Virgo... pics and things are over on the BJP 2012 page  Enjoy!


Thursday, 28 June 2012

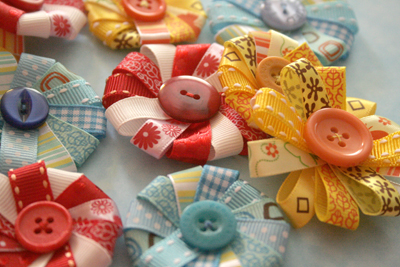
RIBBON FLOWERS

I've been playing around with my ribbon stash again, setting up a supply of embellishments- I love making flowers- in beads, fabric, paper... whatever I need at the time... These are very quick and easy, won't fray, and look great in a single colour or a mix.
You will need 20-30" of ribbon, matching thread and a button. The wider the ribbon the longer the lengths should be, but it's best to play with them to see which look you prefer.
I have put the whole tutorial in the crafts section but here are a few pics to inspire...


These can be made any size, the longer the petals the more you can add... creating a wide daisy. The smallest of these is 1 1/2inches across.
Pop over to the tutorial grab some materials and have a go- once you've made one you'll be making more- the hardest thing will be deciding where to use them all!

Tuesday, 5 June 2012

Twinchie books- so sweet!

My good friend Sonja is hosting her first swap for these cute little two inch booklets... I've never made books this tiny so had to give it a go... especially as I had spent last Tuesday marbling cotton and some papers to stock up.
I wasn't going to make three, I only needed two for the swap, but they turned out so cute I made a spare for me to keep, and I shall be making some more to give to friends.


They were simple to create, make rectangle covers slightly bigger than the 1.5 x 2" pages, decorate and add ribbon. Sew the pages in place adding beads on the outside. Sew in end pages and then glue them to the fabric covers. Press for a while so they dry flat... and enjoy! These don't have anything in them, but I may add some text and images before I send them off. 


If you fancy receiving one of these why not join Sonja's swap and have some fun making your own too!
.

Tuesday, 8 May 2012

Bookmaking Adventure...

More books.... we have a fair coming up at our local cat sanctuary... so I thought I'd make a few topical sketchbooks, in my usual manner with beaded signatures. Instead of using my collaged textiles I bought preprinted fabric and wadding for the fronts...


I printed one of my doodles on the end page to give the owner something to do if they are bored!

Tuesday, 24 April 2012

Promarker storage

I've been looking for a reasonable storage solution for my increasing collection of Promarkers- they're quite chunky so normal pen cases just aren't big enough, and the nice zip up cases only hold 24 or 45 pens...
I don't keep them on my desk as I often work in a variety of places and want them to hand. A rigid stand wasn't appropriate either...
I love recycling fabrics and I happen to have a few books of upholstery fabric samples so I made up a roll to slip the pens into and a bag to keep them together. Perfect!

 8 rainbow sections to keep colours in groups of 10... shame I thought of brown after the fact as I have 9 of those so I've put them in the violet section for the time being... I also coloured a sticker for each pen so I could see them all from above.


Rolled and secured with ribbon. Even like this I can see where each colour is and replace it to keep them orderly.

A zipped bag using the remnants from the rolls. I've made it a bit bigger to allow for more pens, and lined with mountboard for stability. I shall add a small bag for spare lids/fine nibs etc.


Sunday, 1 April 2012

Fabric fun... pincushions, needlecases and flowers...

This week's  art-time has pretty much been taken up with fabrics and fibres. I've had several things I needed to replace for quite some time... eg, a pincushion, a new needle book, a case for my crochet needles... many of which I've had for faaaaaaar too long and are long past their youthful sturdiness.

I found some nice fabrics a while back and decided to use some of that, especially as I can use 3 patterns. The ball I made is so easy- it's an adaption of a baby soft toy. I cut 12 ovals each in 3 fabrics... this should be about 2 inches long, 1 inch wide, but you can make larger or smaller... smaller is seriously cute!!

Here's the finished pincushion...


As you can see it's very simple to create. Sew 3 pieces together and stuff to make a segment. (I added 1/8th inch to the template because I was using a machine and turning them out, but you can oversew if the material allows)
Then sew 4 segments together at one end, twice. The remaining 4 segments are sewn to each available end to create the waist of the ball. I finished it off with buttons and ribbon.
This can be made in one fabric, but I like to vary what I use- both in patterns and material...

As I was in a wool and crochet cycle I spent some time making flowers and hearts... these are cute little things that I hadn't made for a long while and was reminded of by a friend...
I keep all my wool ends just for such projects....

simple crocheted roses


crocheted lilies
sweet frilly hearts
fun combo....
As I'm gradually posting a number of creations that need a pattern of some description I shall create a pattern section soon and add them all there, so if you fancy trying something yourself the details will be available.

Here's a pic of the felted crocet hook case


Wednesday, 14 March 2012

Stitch, stitch, stitch...

I seem to be getting back into textiling more and more lately... I have done alot less painting, but my sewing machine is getting a hammering!!  I've been taking part in a few swaps on stitchin fingers , and this is what I've been working on for the Spring Fabric Postcard swap

It's collaged fabrics and plastics over felt, with ribbon flowers. It was great fun, I love building up with materials, coloured threads and different stitches... each new layer can dictate a new direction and look. I work alot with ribbon, but not like this- I might have to do some more!!

This pair are for the March challenge- Architecture. I love stained glass panels and this seemed like the perfect opportunity to play with the idea. I also love Tiffany and Macintosh, but didn't feel up to such intricate designs... so I chose a star shape and worked out from that, utterly random and intuitive.

As always I work a large panel so I have some left over, and cut the chosen areas from it. I bound these with ribbon to match the scheme and finish the look. I added angelina in places to give an extra bit of sparkle reflecting the light like real glass panels.

I hope the recipients enjoy them as much as I've enjoyed creating them.

Sunday, 19 February 2012

Equinox dolls

Having finished the dolls for the Equinox swap on Milliande's , I finished my own equinox doll last night.. both sides, so she's now hanging up pride of place over the tv. Here's how she looks... I even managed to find some relevant little charms hidden in one of my bead boxes- I love not having to buy stuff for projects!!


 Remember those fimo faces I sculpted and then cast for a beading project? They're in the craft tutorial section if not... well, I decided they weren't what I wanted for that project and set them aside for later use. Perfect for this project, the resin plaster takes acrylic paints really well.


I'm going to make a Summer/ Winter doll to match, but I shan't start her until nearer the time... I need to gather my materials up first... can't wait though, these 3 were so much fun after 40 years since the last one, my how time flies...

Tuesday, 14 February 2012

Too old for dollies?

One has to ask that question occaisionally, and I'm not sure of the answer anymore! Regarding playing - maybe, but a return to creating them after 30+ years... well, maybe I'm not too old for that.
Lois is hosting an Equinox doll swap ready for the Vernal equinox on march 22nd. I couldn't resist... it has been so many years since I created a doll of any kind, and not having an interest in them generally I never felt the need. But to have a handmade doll celebrating the equinoxes seemed like a fun and relevant thing to do. In fact I'm going to do the Summer/ Winter solstice doll too to create  a matching pair.
I had a quick look online for inspiration, and set about re-honing my ability for pattern making. I rough sketch first and then work out the details like positioning,tucks etc. Although these are very simple flat  dolls, I am also going to make a doll with arms and legs while I have all the materials to hand- I'll be keeping this one as half of my celebration pair.
Here are the finished flat dolls... ready to be posted off... and a half finished proper doll ready to be embellished. I'll post pics of it when it's done, but in the meantime I'll be putting the tutorial over in the how-to's textiles section.

Goddess pattern, spring side

Goddess pattern, autumn side
Leggy doll ready to embellish

Thursday, 1 December 2011

Sketchbook fun

I'm still working on my textiled sketchbooks, my current creations are A5, I'm finding that's both a nice size to work, and a reasonable size for sketching.
As well as creating these for sale, several of them will be going to unsuspecting friends for christmas, I can't wait to see their faces when they open them!


This is one of my favourites, spirals and blues. 72 pages of artist quality cartridge paper, yummy, I shall have to make one for myself  after the xmas rush. Here are a few of the others...A5's and A6's


Related Posts Plugin for WordPress, Blogger...