Showing posts with label tutorial. Show all posts

Monday, 1 April 2013

Shibori showdown

At last today- the best bit about spending all those hours sewing tiny stitches into fabric and then gathering them up... dying and opening the stitching!

I spent yesterday sewing 8 squares for our international fabric swap which is going along great guns with lots of techniques and fabrics travelling round the world. I have also written it up as a tutorial over on my How to- Textiles page if you'd like to see more.

Here are a few typical techniques, straight lines, wavy lines, wraps and sewn circles, etc. Some are sewn with running stitch, others are sewn with a running stitch over a tiny fold which gives a lovely spotty double line.


And here's how they turned out... most of them came out beautifully, a couple needed stronger thread so I could pull the gathers tighter, but they still look pretty.Now they're tucked in envelopes ready to fly off, so I'm going to have to do a few more while I've got the dye mixed.


Thursday, 28 February 2013

Woo-hoot! What a pair...

Aww... they really are quite quick to make... here's girly...


And what a pair they make! Don't forget the pattern is over in the PATTERNS section, let me know if you have any trouble with it so I can adjust it.x


Have fun!!


Wednesday, 27 February 2013

What a Hoot..y!

I spent yesterday at the Bluebird Indoor Market in Dover, and while we weren't selling we were chatting away... one lady, who makes gorgeous plush fabric doorstops was crocheting an owl from a magazine pattern and having a bit of trouble making sense of it... some just don't make sense! Anyway, it piqued my interest so this morning I decided to make my own... and try to write an easy pattern to go with... so here's the first one, wasn't too hard to plan and he looks great! The instructions are over in my PATTERNS section.


What do you think? Sweet or not? I'm going to do a girly version now which I'll probably get finished in the morning...
Why not gather some wool up, it doesn't take very much and you can use scraps for a funky version, pop over to the tute and have a go, promise you'll get hooked and want to do more! 


Friday, 25 January 2013

So snow is white, eh?

Good grief! I do a few projects, knit a few bits and all of a sudden I've not posted for forever! I must make a point of squeezing some time to post more...

We were forecast snow eventually in the UK, some would get it more than others, but we woke up last week to a small spattering, followed by an absolute deluge. A rare thing in our southeastern position. We seem to have our own little micro-climate which is more in line with Calais than the town 8 miles down the road! I do like snow- very much, but I don't like weeks of grey, sloppy slush, which is what we tend to get- a nice covering then a prolonged thaw out. Messy, and dangerous, ice over night, slush during the day.
However, the long thaw has been a bonus for me because I wanted to experiment with something since I read about it last year, and with little snow guaranteed  I had to make the most of it... so as the snow slowly disappeared it was perfect yesterday for a bit of snow dying- or so I thought!
Having planned for this some time ago I had all my supplies stashed away; Procion MX dyes, soda ash, salt, squeezy bottles, fabrics, and a few tubs. For a full tutorial of my dip into dying check out my How to- Textiles page... but here is a quickie


The fabrics are soaked in a soda ash solution to make the fibres more receptive to the dyes. While this was happening I gathered up the rest of my equipment and mixed the dyes.


These are the small containers with a bamboo fabric scrunched up in the bottom of each, snow piled on top and dye squirted over the snow. All the containers were left for over 24 hours, the sled was left outside to thaw naturally, while I brought the small ones in overnight.


This is a close-up of one of the bamboo pieces, thrown into the container with excess dye from the mixing. Not too bad considering it was most of the colours together.. it is brown, but so many shades and patterns!   I did quite a few pieces, one of which I have to cut into 12" squares for a Fabric Swap I'm hosting on Stitchin Fingers. We're all trying new techniques and swapping our results- what a perfect way to create a unique stash and find techniques we've not tried before... this is our first month so I'm really excited and can't wait to see what everyone else has done!
The sled was a little more fun... not only did it not thaw out outside, when I brought it into the kitchen it still didn't want to thaw! What does that tell you! I did cheat in the end and hurry it along.... the results are over on the How to page.
If you want to try this but don't have the luxury of snow you can use ice with dry dye... that's my next project once the fabric arrives. Why not have a go?


Friday, 11 January 2013

Bookmaking fun...revisited

It was some time ago that I made a concertina book after a prompt in the Hinges group on Milliande's. The plan was to turn it into a family photo album- hence the specific stencilling on the canvas covers... that was so long ago!
As part of my "Finish up 2012 projects" campaign I sat down and finished it- woohoo! As it is a present for a family member that we've not seen before 2005 the photos are really about the kids growing up...
Here it is finished


There is a tutorial to make the book over on the How to's... Books page if you'd like to have a go. It's a beautiful little book and so versatile- you can use it for any personal story. Why not have a go?


Saturday, 29 September 2012

Vintage meets modern...

Well, it's certainly been a bag week, this week... yesterday I created a creamy vintage/modern rucksack with upcycled fabrics and some of my collaged textile fabric. I had some left over so made a little wallet too.


This bag is basically the same pattern and method as I've detailed in my rucksack tutorial over on my how-to's textiles. I don't use a pattern per se, I just cut to size and play, but the construction method is very simple to follow if you want to have  a go!  I'm doing a tute for the wallet over the weekend so I'll let you know when it's up and available. They make a lovely set, eh? What about making a matching personal pocket too? for all your ladies accessories... there's a tute for that over there too. Just grab some fabrics and get cutting... you'll love it!!


Monday, 24 September 2012

Rucksack in progress...

Well, today's been fairly productive... I almost got it finished- only the straps, eyelets and hoops to add. Here's how it looks so far...


I'm just typing up the tutorial so far, that will be added to the how-to's textiles page very soon, and tomorrow I'll have my bag completely finished.
As you'll see by the tutorial I tend to make things up as I go along- you really don't need a pattern if you understand the construction rules. If you want to follow the tutorial I began with 1m of 45cm fabric and quilted 60 5" squares for the main piece. I cut the bag the whole length of the piece at 16 1/2" deep. That should give you a gauge for the other pieces. The straps are the whole length and 4 1/2" wide. Pockets, flap and all the loops can be whatever size you like depending on how much fabric you have left to play with. 
Although I've reiterated this in the tutorial here is a basic list of pieces you will need from 2 1m pieces;

2x 36 x 16 1/2" main body
2x  14 x 5" base
2x 36 x 4 1/2" straps
2x 5 x 9" pockets or to size
2x 6 x 2" strap loops
2x 5 x 5" strap reinforcements
2x 4 x 2 1/2" loops

These should easily fit into 2 m of fabric- the straps, loops and reinforcements can be from one piece or both, whatever you decide.

Check back tomorrow for the completed bag...


Sunday, 23 September 2012

More bags in the making....

This week I have been alternating cleaning the mess from the builders with sewing a couple of projects. I can't clean it all in one go- that plaster dust gets everywhere and it doesn't matter how often you wash down, it still reappears the next day.
I have made another rucksack, which has turned out so utterly sweet, but I can't post a pic yet because it is a pressy for someone who will see it if I post- so I'll post the pic in a week or so once I know it's arrived safely. All I will say is that it is beautifully cream, with LOTS of pockets and a piece of my collaged textile as the flap... 
In the meantime- for those colour junkies like me I've also been prepping for my new bag... I wanted funky, colourful, textile this time- my felted satchel has served me well for a few years now, but it's time for a change!
I love batik so I have quilted squares together, with the edges to the right side, then sewn ribbon down the seams to strengthen them...

My wrong side...
The right side before the ribbons...

I love the frayed edges, it's such a shame to hide them so I'm making a feature of them. I've backed this with a pre-quilted fabric also donated from my mum's super-stash. I haven't decided on the exact pattern yet, but I think I'll make another rucksack... I shall be photoing and writing it up as I go so there will be a tutorial in the how-to's textiles section in a while. Tommorrow I'll cut out and prep all the pockets, etc. so keep popping back to see how it develops...


Wednesday, 8 August 2012

Making paper gift bags...

Wow! I've done it again... I seem to spend less and less on the internet as weeks go by... probably not a bad thing, but even so, it's making it hard to catch up.
Following on, and continuing to redo my studio I've repackaged all my jewellery and accessories with  newly designed cards and bags. I hadn't realised how much stock I still had, so it was good to see it all out at once again. They're all done now so I needed something nice to send them off in, and being fed up with those bulk-buy plastic bags I decided to make my own. So much fun, and you really get into a routine when you are doing 30-40 at a time.

Here's how they turned out- I've created 3 lots so far, each with a different paper; brown parcel paper, crafting magazine and a big glossy arty magazine.


These are the brown paper bags... I've added a tutorial in the How To- Crafts section.  I've added printed labels, and now my own design "recycle" tags. They are so simple to make I shan't be buying another bag again! And if you use different size magazines you can get different sized bags. I recommend gluing 2 glossy sheets together to make a large gift bag and keep the pages upright. They look great if you coordinate your magazines/paper to your stock...
here's a few... using a papercraft mag, and  a glossy art mag....

Double-spread  papercrafting mag, and my own tags....


And single glossy pages
Have a look at the tutorial and have a go... you'll enjoy how easy they are, and it'll save you an arm and leg in future pressie wrapping! If you're like me you'll have been saving all your gift-wrap from years passed so here's a chance to use some of that up!


Thursday, 28 June 2012

RIBBON FLOWERS

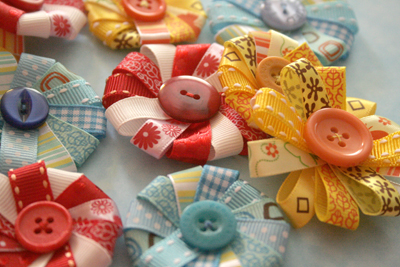
I've been playing around with my ribbon stash again, setting up a supply of embellishments- I love making flowers- in beads, fabric, paper... whatever I need at the time... These are very quick and easy, won't fray, and look great in a single colour or a mix.
You will need 20-30" of ribbon, matching thread and a button. The wider the ribbon the longer the lengths should be, but it's best to play with them to see which look you prefer.
I have put the whole tutorial in the crafts section but here are a few pics to inspire...


These can be made any size, the longer the petals the more you can add... creating a wide daisy. The smallest of these is 1 1/2inches across.
Pop over to the tutorial grab some materials and have a go- once you've made one you'll be making more- the hardest thing will be deciding where to use them all!

Tuesday, 10 January 2012

Little Faces- part deux

Well, I decided to go ahead and make more faces, once I'd neatened up the rough patches a bit. They are not exactly what I wanted, but to get the project underway I really need to have the faces ready so these will do for this project. I will be making more feminine ones later!!


As my reusable moulding rubber is at my studio, and the weather's too yuccy for me to walk down there, I've decided to try the alginate compound instead- I've had it for so long, but never got round to using it- just like the resin plaster which will also be used up in this experiment. (Yet one more justification for my super- stash of materials and equipment that is labelled "hoarding" by my hubby!)
I'll be adding the process in the How to's- craft section. It's not too messy, given that it's plaster, but I would recommend doing it in the kitchen- it's hard to get out of carpet- oops!  

So here are the next stage of my army of faces.... at least these will be easier to refine than cooked fimo.


As I made up extra in the first batch I also plastered some MDF tiles which I had been meaning to do for a long while. These will be carved into, built up on, painted, sprayed and waxed, at some point! The hearts were also a little forethought- I have a small project in mind for them too....


Monday, 5 December 2011

Origami xmas fun....

As it's getting close to sending time for all those funky xmas cards, I thought I'd add something a little different...
I add a little origami heart in my RAAK's mail, in alsorts of tissue and paper, they're fun and very easy to do...


but I thought I'd get a little festive and send little stars for xmas. They are quite easy to make and look lovely in a group...so keep your eye on the mail, one may be on it's way to you!

 I will be putting tutorials in the how to section soon, so keep checking back.

.

Wednesday, 23 November 2011

Mandalas...part deux

I know I should really be working on so many other projects, but I need to get this out of my system first. I'm really enjoying them, but I love the effect a bit of doodling has....


Perhaps I should call it a day for a little while...I must finish the goodies box and do another 1000 words on my essay....Oh well! These 3 have been put through my filter again...what a difference!! In fact the bottom one is from the previous posting...you'd not know....


Friday, 18 November 2011

Mandala fun...

I've not created mandalas before, and with all the other work/playing that I do, I might never have got round to it if I hadn't seen a free tutorial on willowing . Guadalupe has posted video tutorials to work through the stages...great fun!

As these are my first, and it's coming up for xmas card posting, I thought I'd follow the theme....


I might add a bit of doodling later...but for the time being I shall leave them like this on the paper....although I have put them through my fave filter already

Have a go...it's great fun and quite meditative, like doodling!

.

Tuesday, 15 November 2011

Heart Scent Pouch...

It's coming up to Christmas, and I'm doing my best this year to not actually spend a penny on it!! (Directly, anyway, I may need certain supplies to complete my projects!) Over on Milliande's Palma has begun a swap for an International Goodies Box  What a great idea!!! There's a list of items to choose from to create, and I'm working my way through...the journal, purse/pocket and now scented sachet are all done...
Here's the scent sachet, or my interpretation!! Instructions are over in the how-to's textiles section I've made bags, cushions, wallets, and even my wedding ring pillow in a similar way, it's so versatile and fun, give it a go!! I always show the quick and easy way, minimum pinning, minimum fuss- my mum would go mad if she saw- she was a dressmaker/tailoring teacher, very by the book! Stood me in good stead though- I know the right way, so I know I can work out the shortcuts too!


 So here it is, a cute little woven ribbon scented pouch, plumped up with lavender heads from my garden. I do hope my box doesn't have to go to Australia with all their customs restrictions on seeds/wood and flowers, etc. I'd hate to have to empty it....

.

Saturday, 12 November 2011

Little Pocket Pouches

It's coming up for Christmas and one of my favourite stocking fillers is a little pocket pouch...useful to keep all manner of goodies together; make-up, pens, keys, jewellery, or my fave- certain female products that you have to carry round with you. It's all so much more discreet if they're tucked neatly into a pouch.

I've put a tutorial over in the  how-to textiles page, if you feel like having a go! If you use scraps of material it will only take 15 minutes...no time at all for such a funky, useful little pouch.

Personal Pockets, recycled sheets, school shirt and baby wipes


Don't forget to send a pic of your creation for the gallery!! Have fun- go mad- bead it up after you've turned it the right way!!

There is now a pic of Mary's creation in the Friends' Gallery, take a look, they are super!!!
.
Related Posts Plugin for WordPress, Blogger...